Pawonation.com is a dynamic news portal delivering up-to-date and reliable information across various categories, including global news, technology, business, and lifestyle trends.
47 Clever Car Detailing Hacks That'll Make You Shine Like a Pro
Admin
... menit baca
Dengarkan
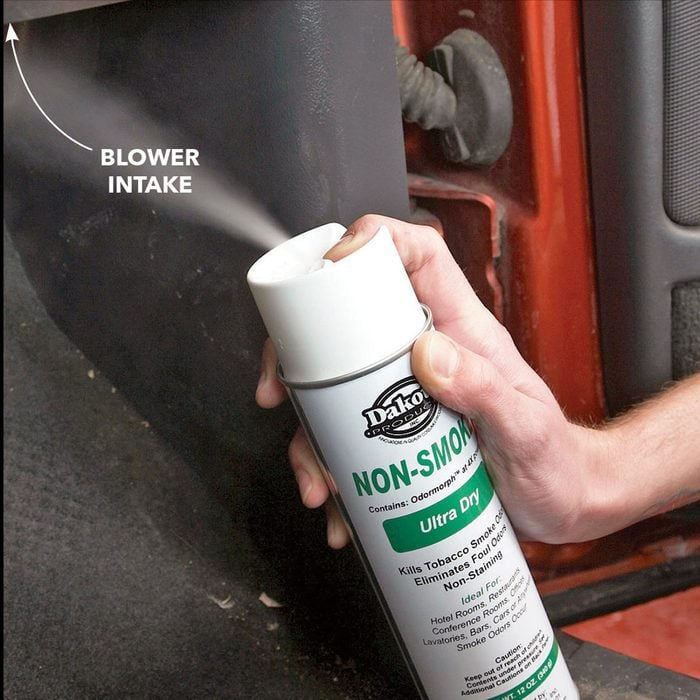
Destink the Interior
To counteract tobacco smoke, purchase an aerosol spray can.
Dakota Non-Smoke
Hold the aerosol can about 12 to 14 inches away from the car’s surfaces such as the fabric roof lining, gently spray the headlining (avoid saturating it), seat areas, inside of doors, and carpets. Next, set your fan speed to maximum and change the climate control settings to recirculation mode (“recirc” function); if “re-circ” isn’t available use "Max A/C". Locate where air enters by positioning a piece of tissue paper close to the blower motor; once found, direct the nozzle towards this spot and release the product in short bursts until covered. Keep all windows shut during treatment and let sit undisturbed for an hour minimum. Initially, expect a fragrance reminiscent of baby talcum powder which should dissipate over time.
Shop Now
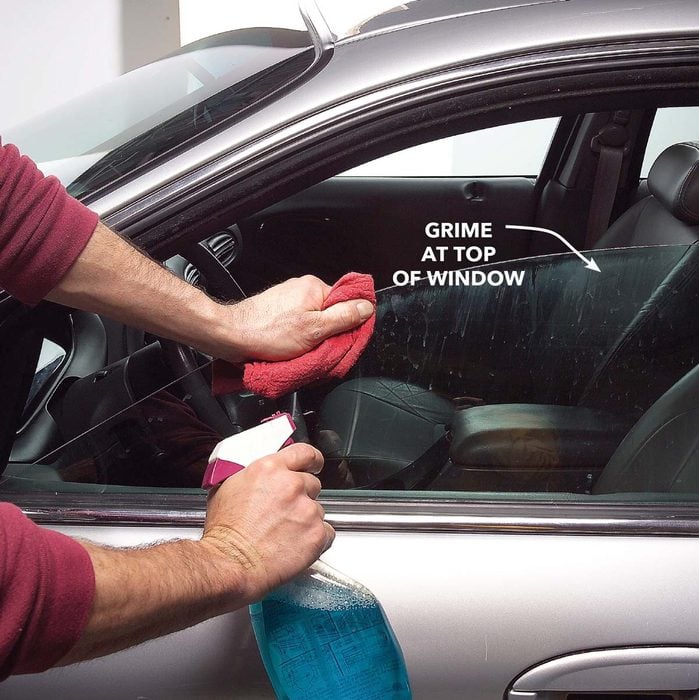
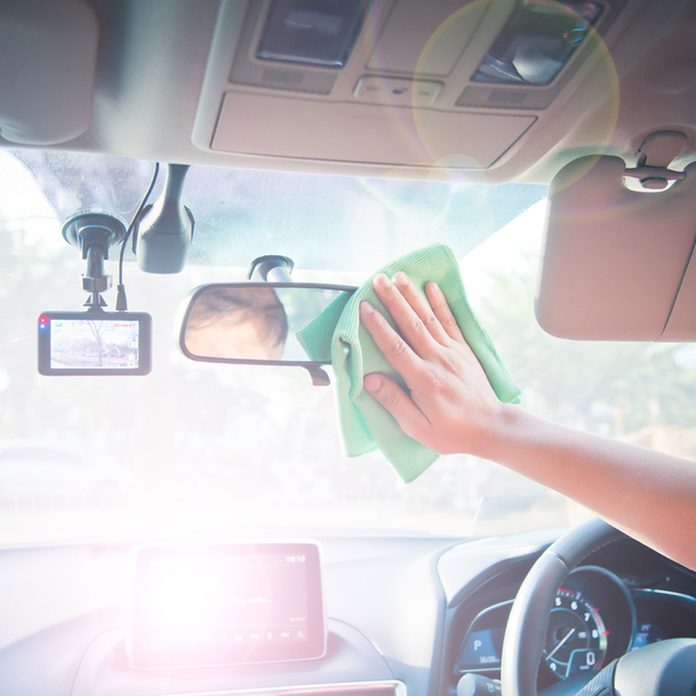
Clean the windows, including the upper edges.
Have you ever noticed the dirty streak at the top of car windows when they’re only partly lowered? Many folks tend to ignore this area during a rushed washing session. Just spend a few minutes on it;
Windex
And just a clean cloth is enough.
Check out this video to see some of our top DIY car detailing tricks demonstrated:
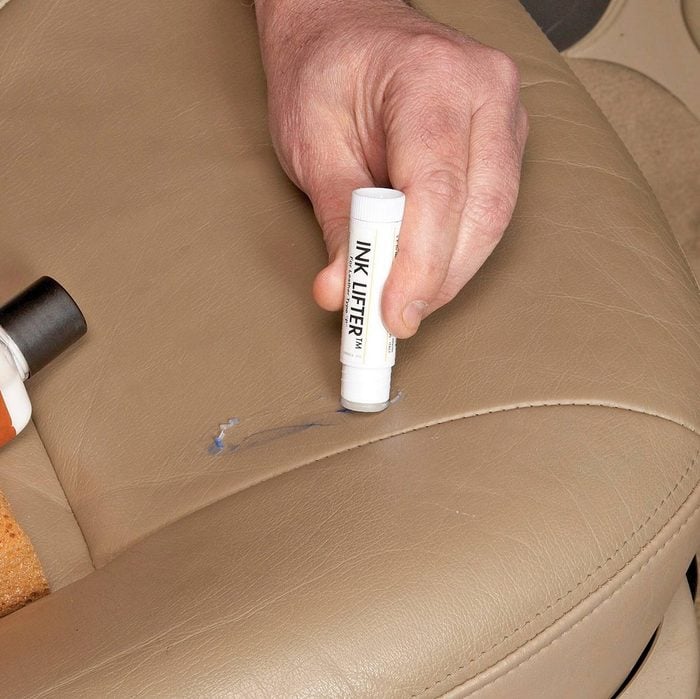
Clean the Leather
This might seem drastic, but if your car has leather seats, purchase a leather-care kit and leave it inside the vehicle (a popular brand is
Leather Master Leather Care Set
Because cleaning up spills immediately greatly enhances your likelihood of a thorough cleanup. Waiting can cause lipstick, ink, and dye from clothes (as well as plastic shopping bags) to become permanently stained within just 24 hours.
Precondition the leather with a conditioning product prior to beginning the staining procedure. Apply the ink remover directly onto the preconditioned leather and massage it gently. Allow it to rest for half a minute, then remove it using a fresh cloth. Afterward, use a leather cleanser followed by an application of leather protectant.
Shop Now
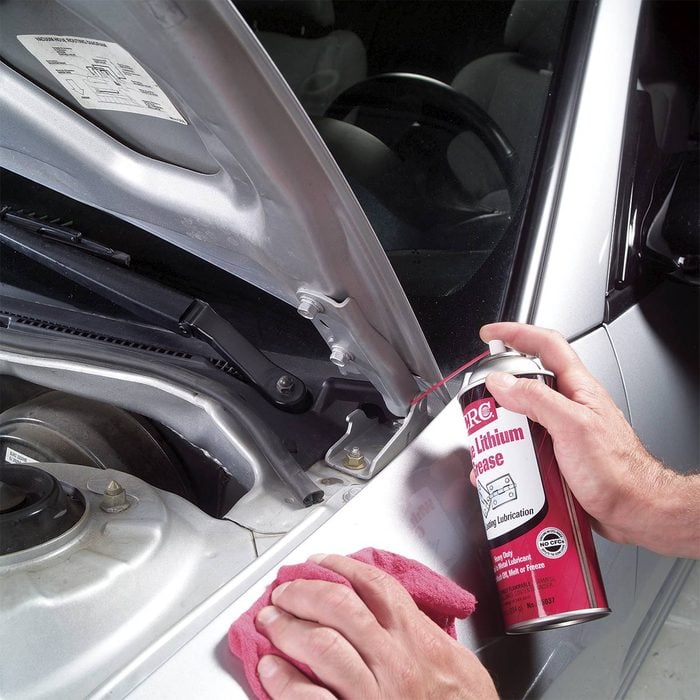
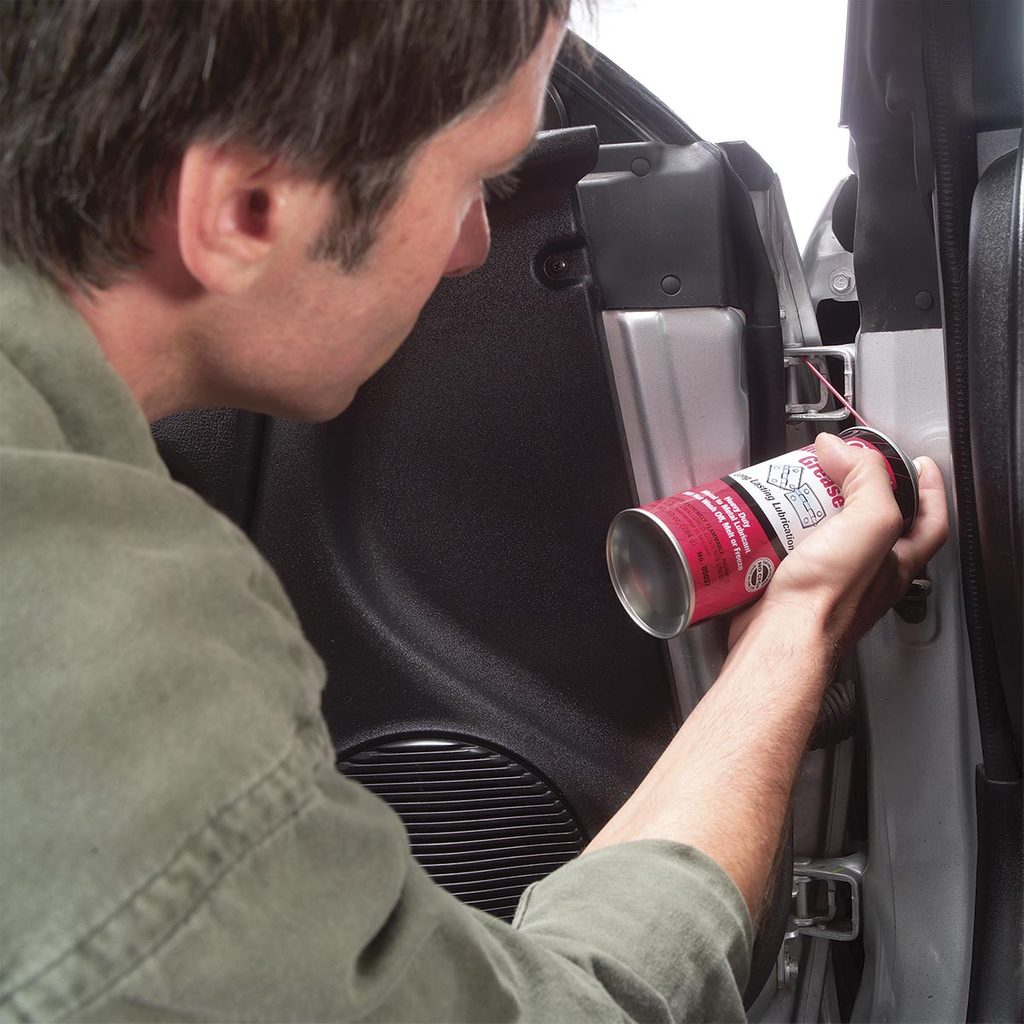
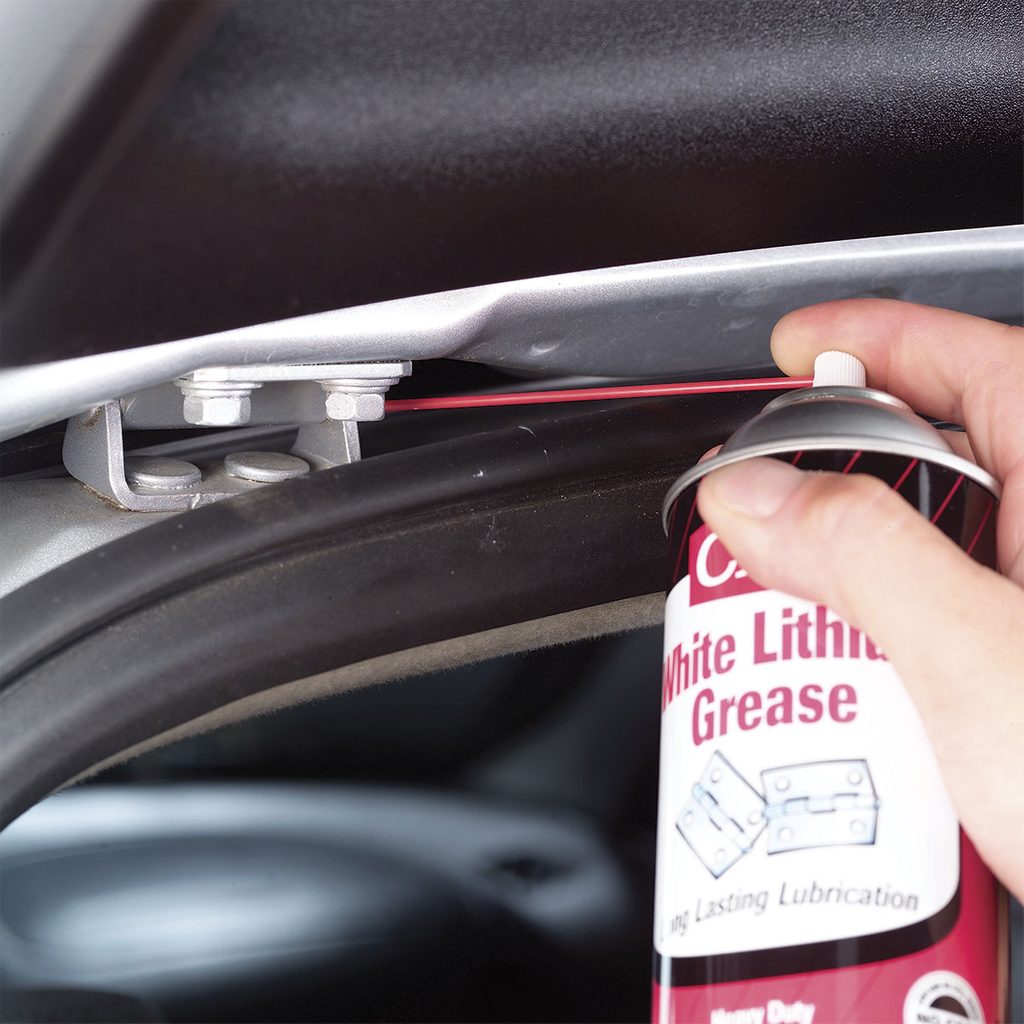
Lubricate Hood Hinges
Wipe the hinge area
Using a clean cloth, spritz it with white lithium grease or apply a few drops of standard engine oil. Operate the hinge multiple times to ensure the lubricant penetrates effectively. Make certain you coat both surfaces of every hinge. Remove any surplus to prevent dirt accumulation.
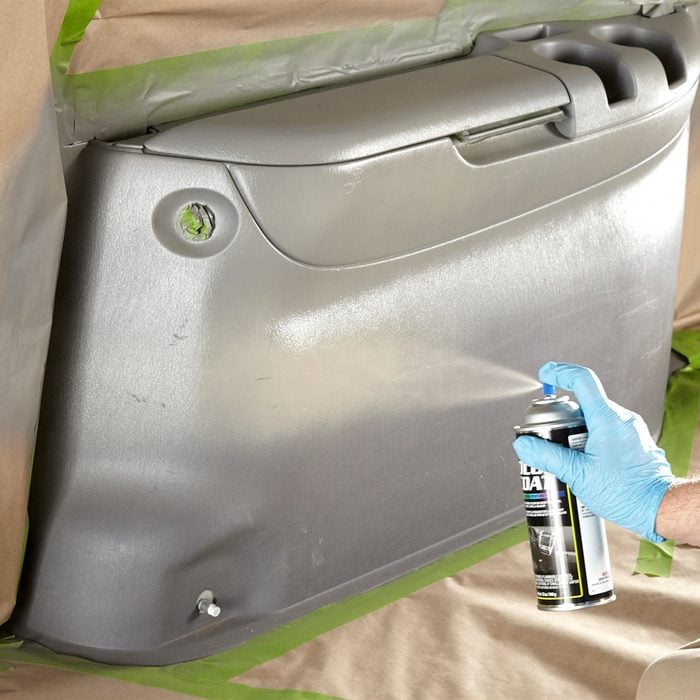
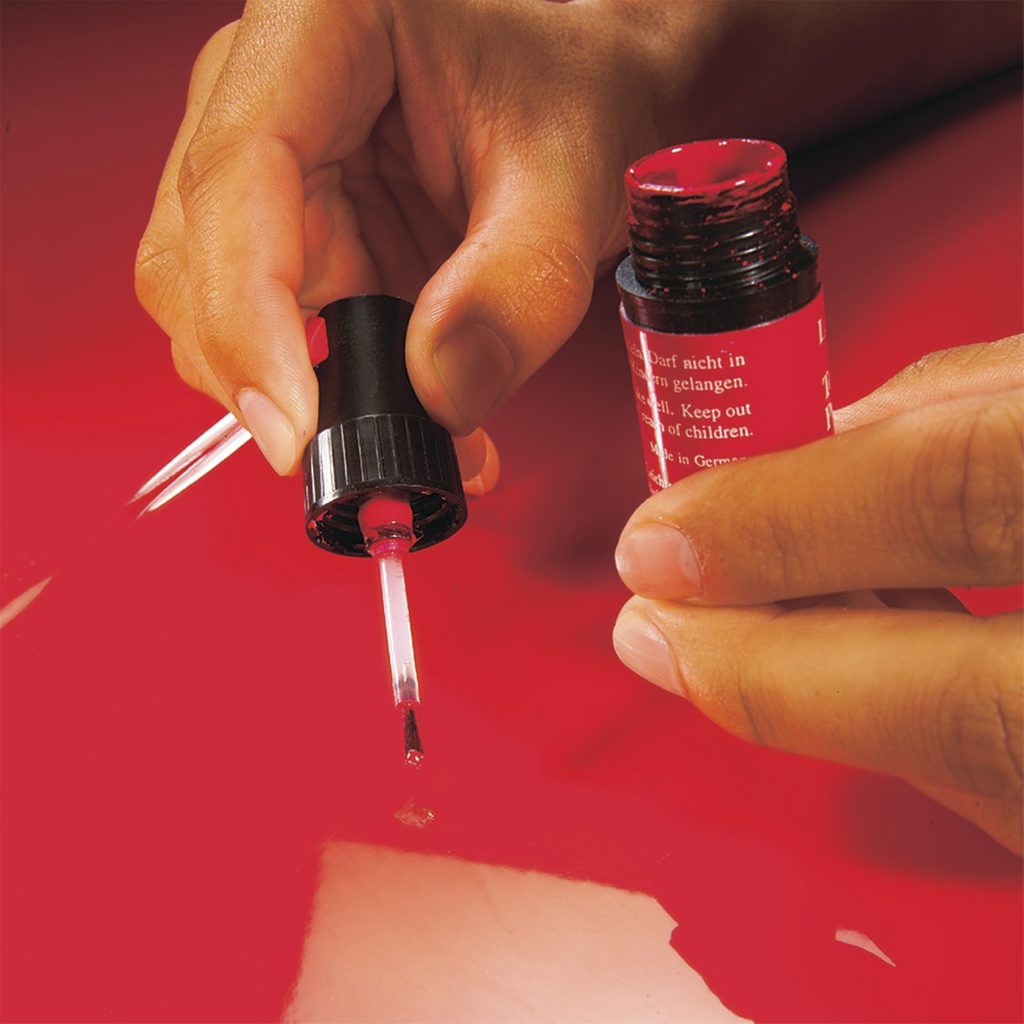
Plastic and Vinyl Colorant
Spray on several light
coats of colorant
(
Color Coat
is demonstrated), permitting 5 to 10 minutes between each coat. Allow the colorant to dry completely for 24 hours prior to use.
Shop Now
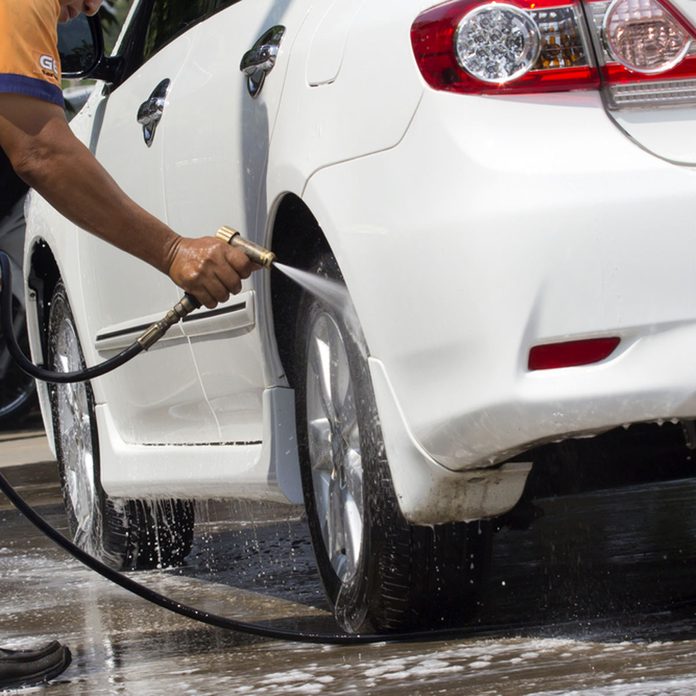
Rinse Before Washing
If you apply soapy water to your dry paint, you'll merely embed the surface dust and dirt from the roads into your paintwork.
Professional detailers
Always begin with a thorough rinse using clean water to eliminate as much dust and debris as you can.
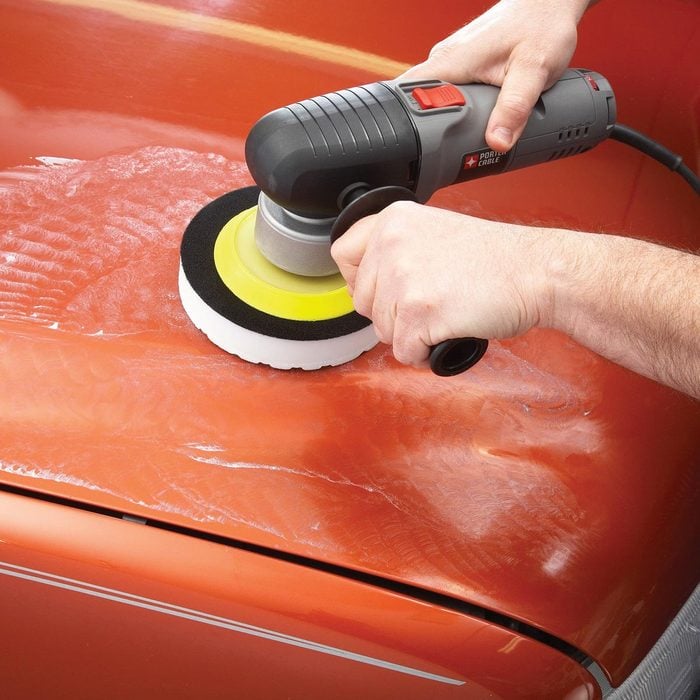
Polish the Finish
Many car owners confuse
polishing
However, these are distinct processes. Polishing eliminates minor surface flaws and scratches, and enhances the sheen of the finish. On the other hand, waxing provides additional luster and shields the finish against environmental damage. Here, learn about the distinction between the two.
car polish and wax
.
Many people who do their own car work avoid polishing since they're not willing to spend money on a polisher or put in the effort for hand polishing. However, polishing your car’s paint is essential for achieving the highest level of shine (even professionals wouldn’t bypass this step).
Place a small amount of polish onto the pad and evenly distribute it by moving the pad over a 2x2-foot section. Operate the polisher at a low speed initially to ensure the compound covers the whole surface properly. Afterward, increase the speed so the device can handle most of the cleaning process efficiently. Remember to inspect your progress periodically.
best car vinyl cleaners
.
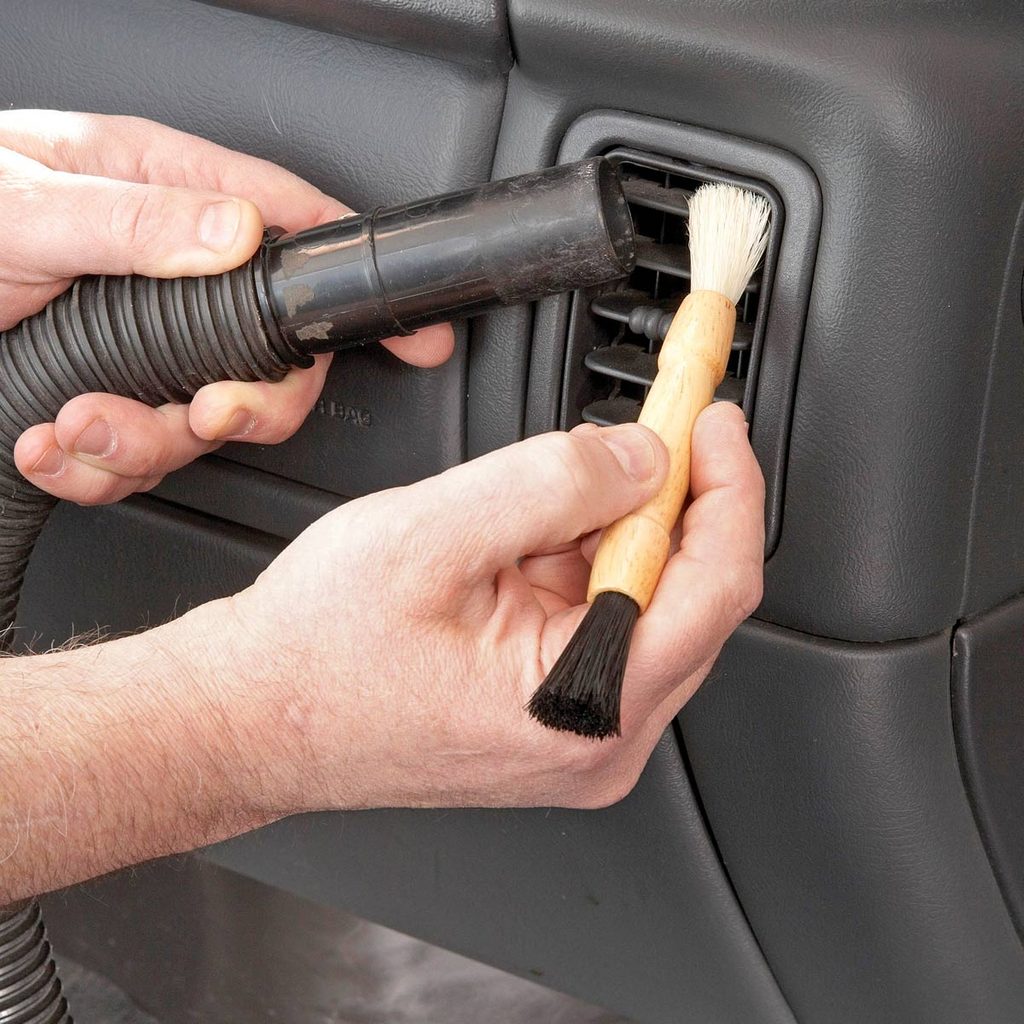
Clean the Air Vents
These louvers really attract dust, and they end up being quite a magnet for it.
vacuum
with a brush attachment just won't get it all. Take an inexpensive artist's paintbrush and give it a light shot of furniture polish. Work the brush into the
crevices
To gather the dust. Clean the brush with a cloth and proceed to the following one.
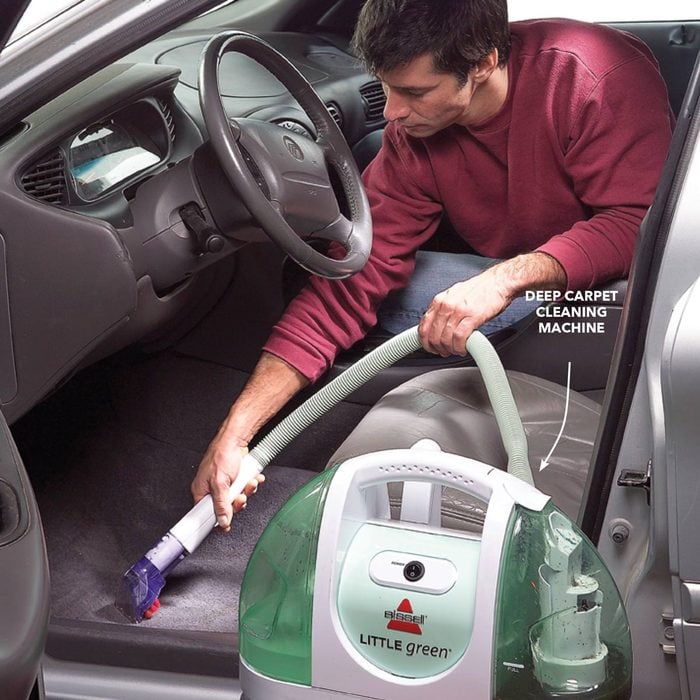
Deep-Clean Carpet and Upholstery
Use a
carpet cleaning machine
to get the deep dirt that settles into the fibers of the carpet. (Clean cloth seats this way as well.) It sprays the carpet with a solution of water and cleaner and then sucks the dirt and grime into a reservoir. A machine like this pays for itself after just a few uses. You can also rent one from a rental center or use a spray-on cleaner and a scrub brush instead.
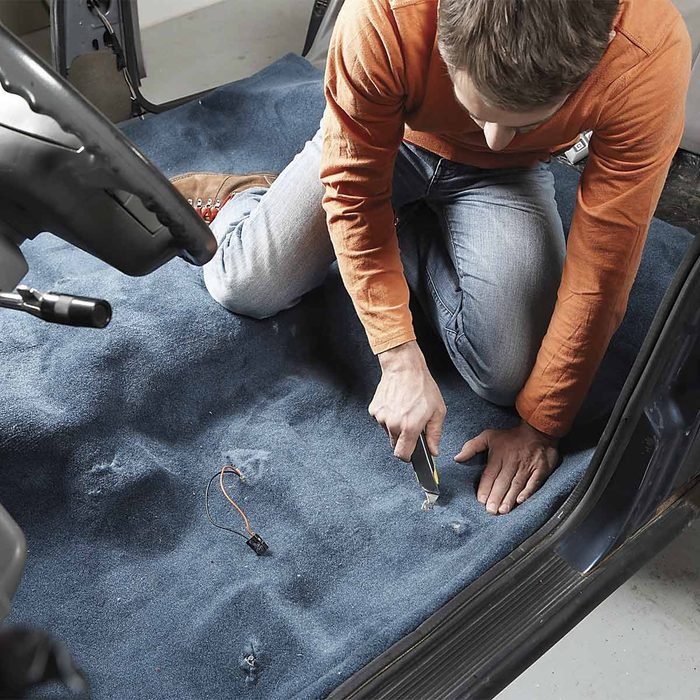
Swap Out the Carpets in Your Car
You scored an amazing deal on a used car, but the carpeting inside is really in bad shape. It’s beyond repair.
stain removers
—the ideal option is new carpeting. You can purchase custom-fit carpets designed explicitly for your vehicle’s make, model, and color.
install carpet
In most instances, it will likely cost around $200 and can be completed within an afternoon.
Apply Paint Sealant Yourself
Paint sealant
is a good idea, but you can easily apply it yourself and save the cost of a dealer or detailing specialist application.
SHOP NOW
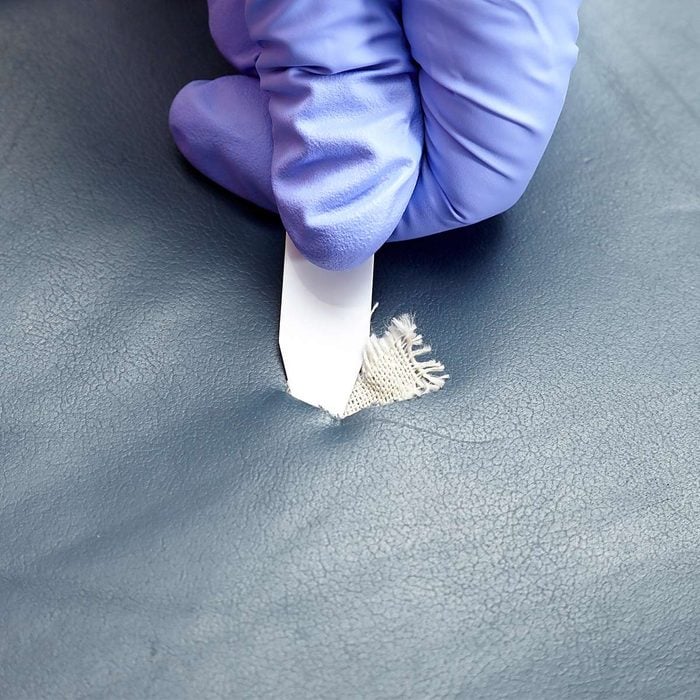
Repair Rips in Leather Seats
A l
The leather/vinyl repair kit is affordable.
, and the repairs take just one hour. Don’t anticipate flawless results though. The tear will remain visible, and achieving an exact color match is unlikely. Nonetheless, this solution should prevent further damage and make the tear less noticeable compared to leaving it as is.
Shop Now
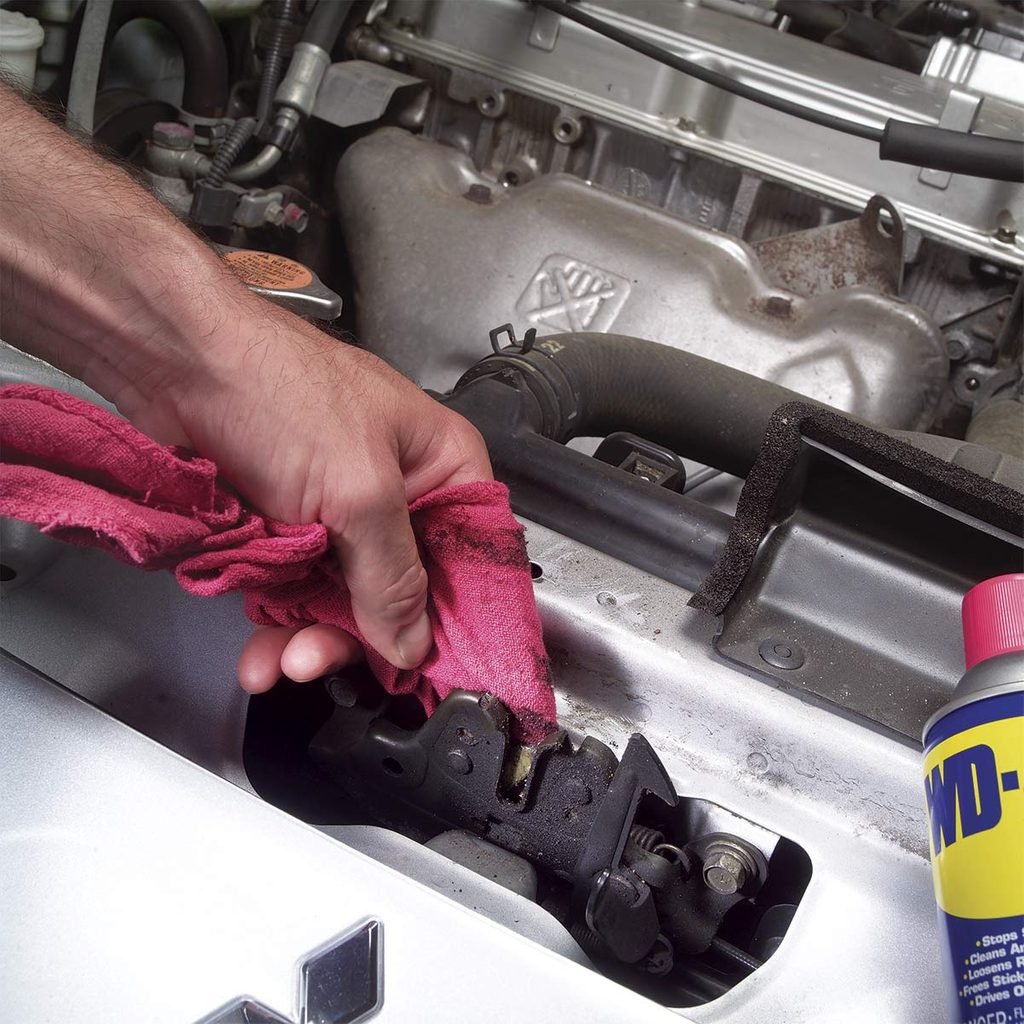
Clean the Hood Latch
Use a clean cloth to remove the grime and dirt.
Try to get any bits of sand that may be embedded in the existing grease. If you see rusted or stuck parts, give the latch a spray of
WD-40
First, proceed to operate the mechanism multiple times. Afterward, wipe it clean once more and apply a generous layer of lubricant.
white lithium grease
.
Shop Now
Shop Now
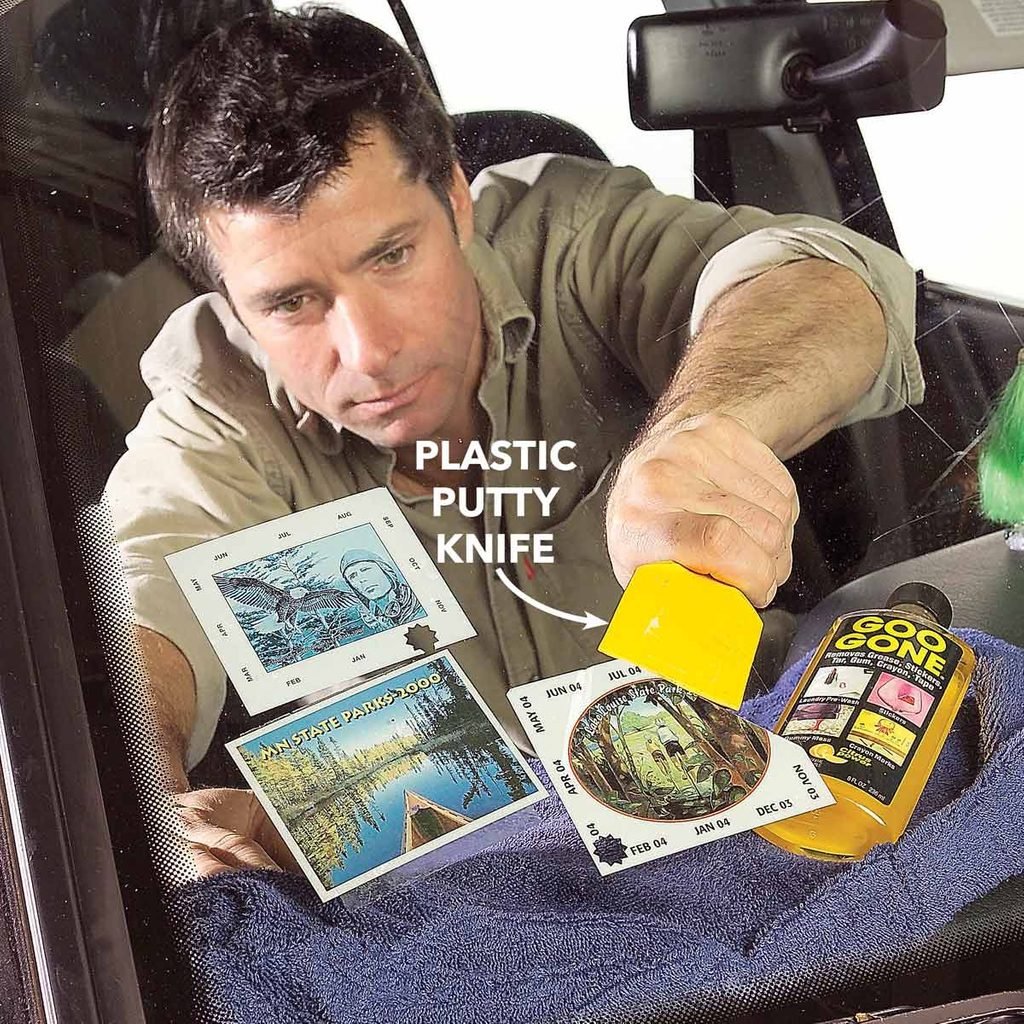
Best Way to Clean a Car: Scrape Off Those Annoying Stickers
Every sticker from your national and state parks might bring back wonderful moments, yet they could pose a visual distraction when collected over time. High-quality ones should come off easily if you manage to lift a corner and gently peel them away at a right angle. However, some others may leave behind sticky remnants and demand extra care during removal. To protect your dashboard, lay down an old towel underneath before starting.
Apply a solvent such as Goo Gone.
Scrape it clean and then wipe it off.
Shop Now
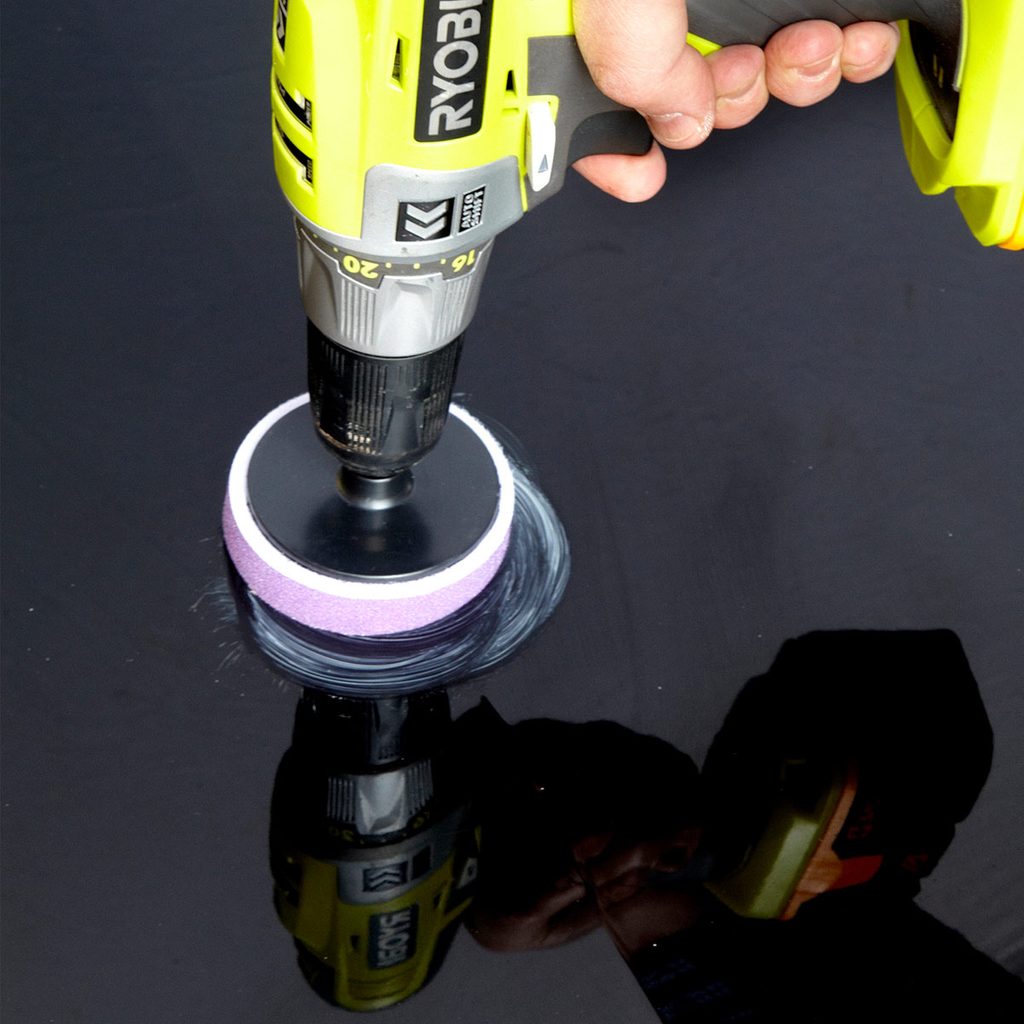
Remove Minor Paint Scratches
Select 3,000-grit sandpaper, rubbing and polishing compound, along with polishing pads. Additionally, ensure you have access to either a portable drill or a dual-action (DA) polisher. These items are generally available over-the-counter at automotive supply stores. Follow this process for what needs to be done:
remove paint scratches.
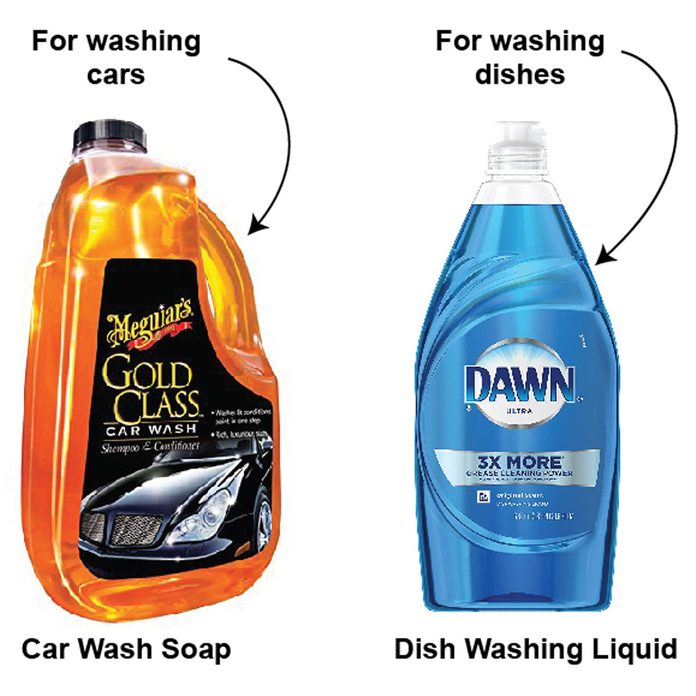
Use the Right Soap
Dishwashing liquid is the go-to choice for most DIYers. But it shouldn't be. Dishwashing detergent is simply too harsh for auto detailing. It sucks important oils out of your car's finish and can actually shorten the life of your paint.
Curious if you're possibly employing incorrect cleaning agents at home? Take a look at our selection of top-notch household cleaning supplies and products.
Purchase Meguiar's Car Wash Soap today on Amazon.
Shop Now
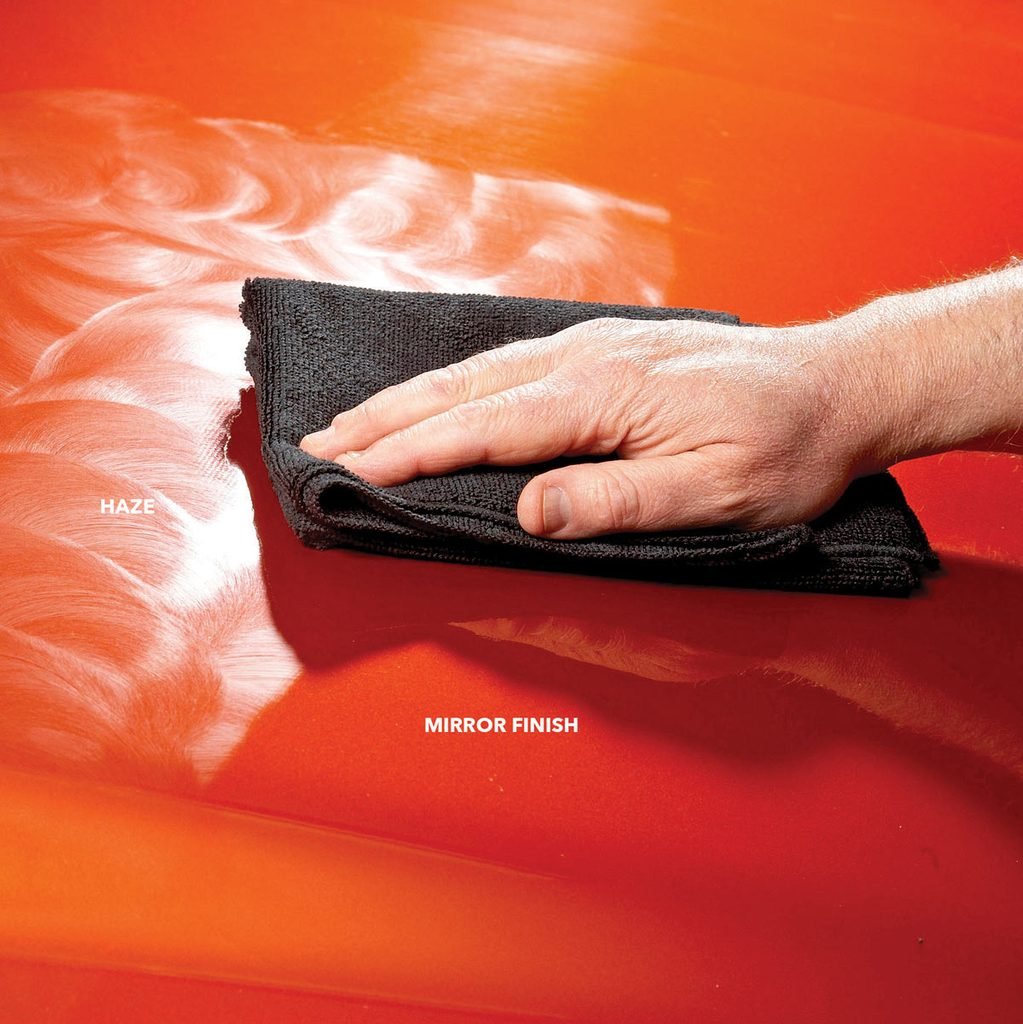
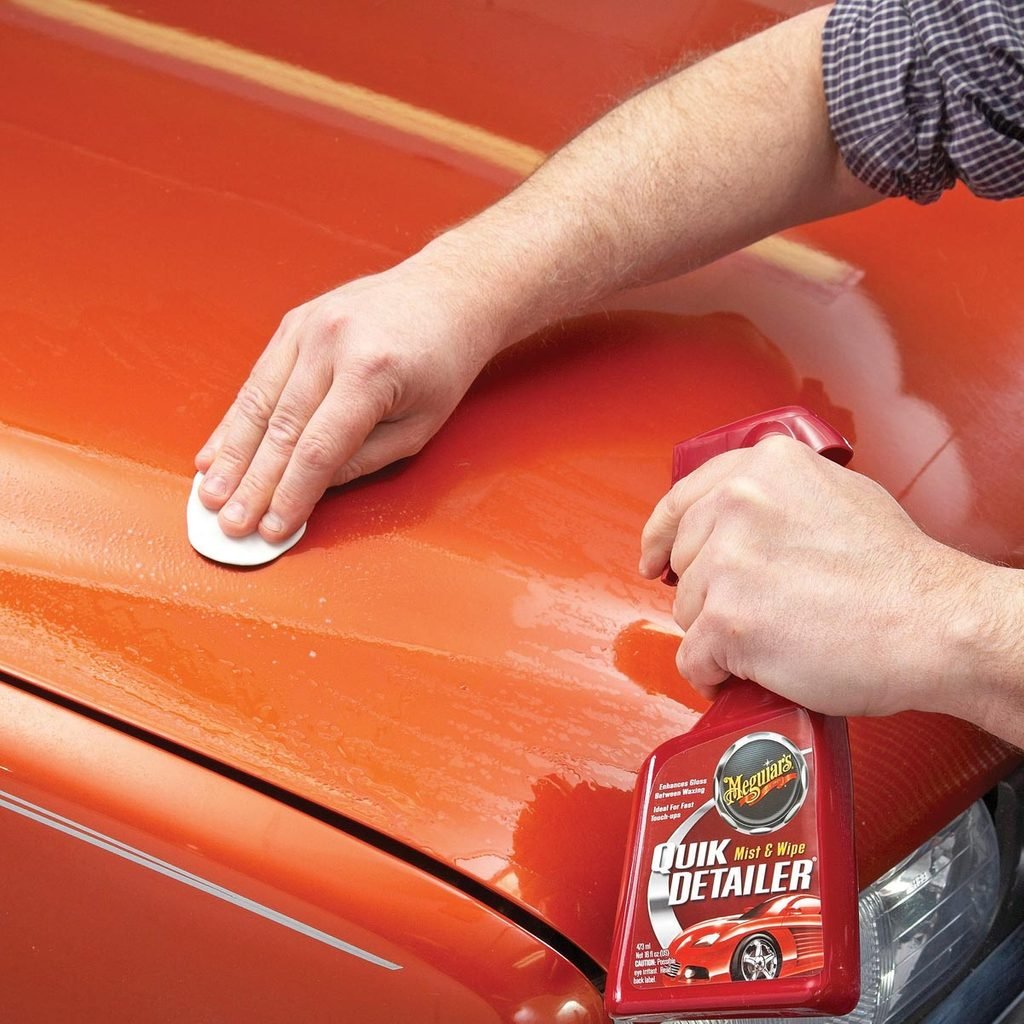
The Best Method for Cleaning a Car: Achieve a Mirror-Like Sheen Using Synthetic Wax
Many enthusiasts vouch for carnauba wax because it creates a rich, warm luster. However, we favor the glossy, almost water-soaked appearance offered by modern synthetic polymer waxes, often referred to as paint sealants.
Meguiar's Ultimate Liquid Wax
It costs more than other synthetic waxes, but it doesn’t leave a whitish residue on plastics or trims, which is definitely beneficial. Additionally, it’s very simple to use. Spread the wax onto the foam pad and work it into the surface using circular motions. Finally, remove the leftover haze by wiping it clean.
microfiber towel
Replace with a fresh towel immediately once the initial one becomes saturated among our handy automotive tips.
Eliminate squeaky doors
If the door screeches each time you open it, the hinges might be seized due to rust. If this is the case,
squirt the hinges with WD-40
To release them, and shift the door multiple times to apply the lubricant. After ensuring the hinges function smoothly, spray them with white lithium grease or motor oil, run the door through its motions several times, and remove any surplus afterwards. Inspect the door latch for signs of rust. Numerous modern door latches feature a non-metallic composite mechanism that ought to be treated with a burst of silicone spray.
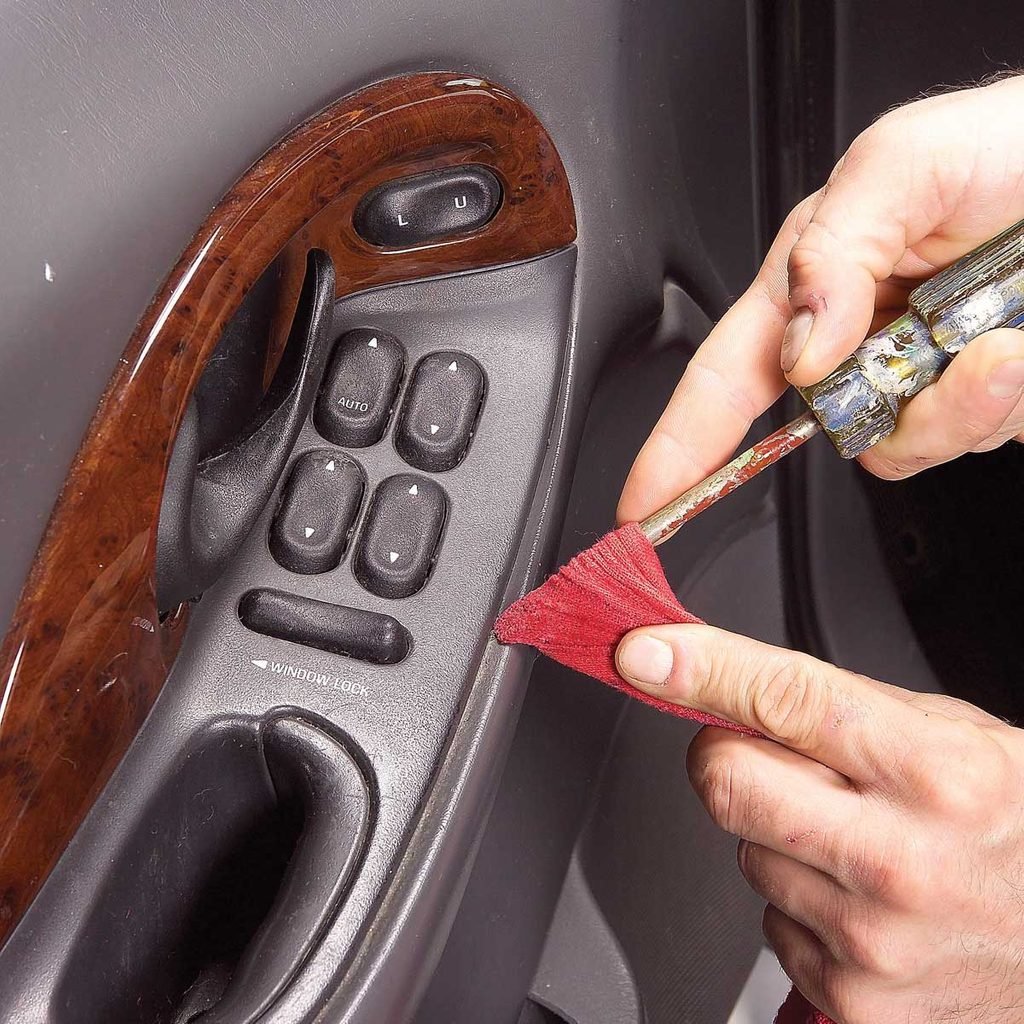
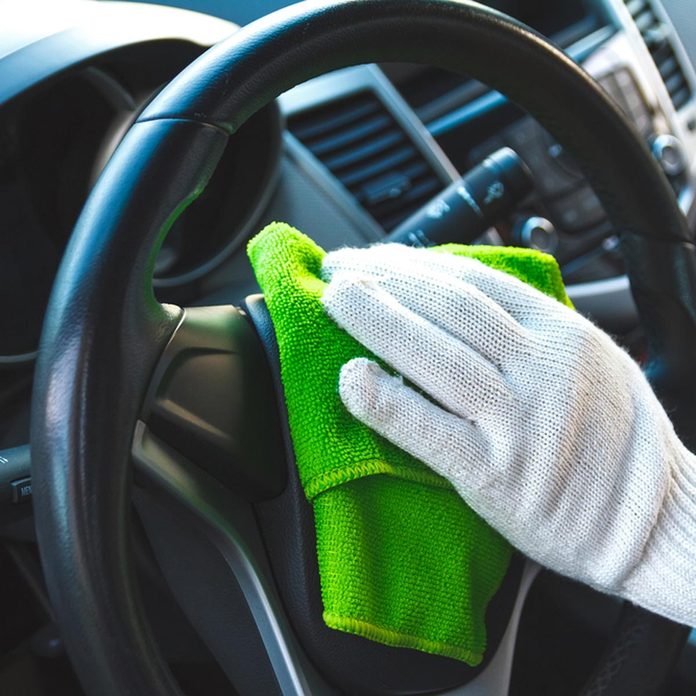
Make Sure to Tidy Every Corner and Crevice
Detailing means just that—finding and dealing with all the trim lines and recesses that a quick once-over cleaning job misses. Wrap a cloth around an old, worn screwdriver (without sharp edges) and spray
Simple Green
Use an all-purpose cleaner on the cloth. Gently move it along the trim lines to remove buildup. Continuously refresh the surface of the cloth. Also clean around all the buttons and controls. Finish with a revitalizer like
Armor All
.
Pick one of the top 10 car cleaning kits available to assist you in getting started.
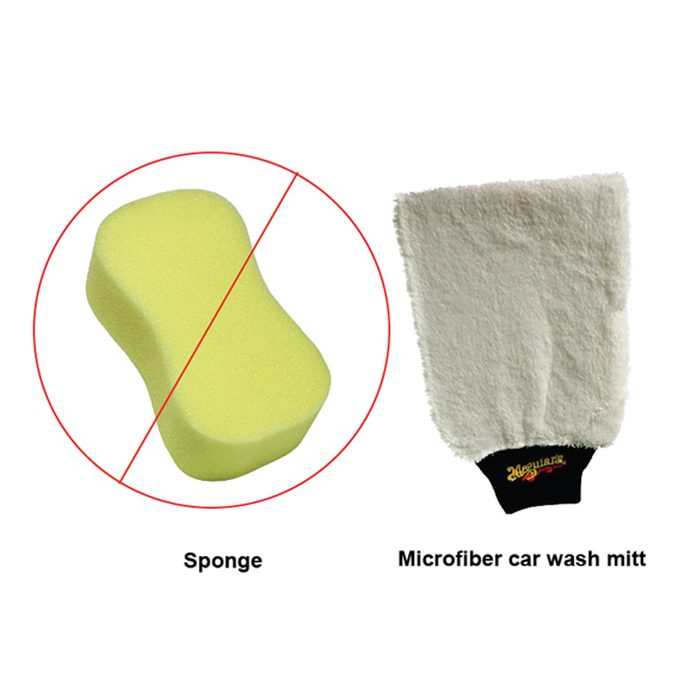
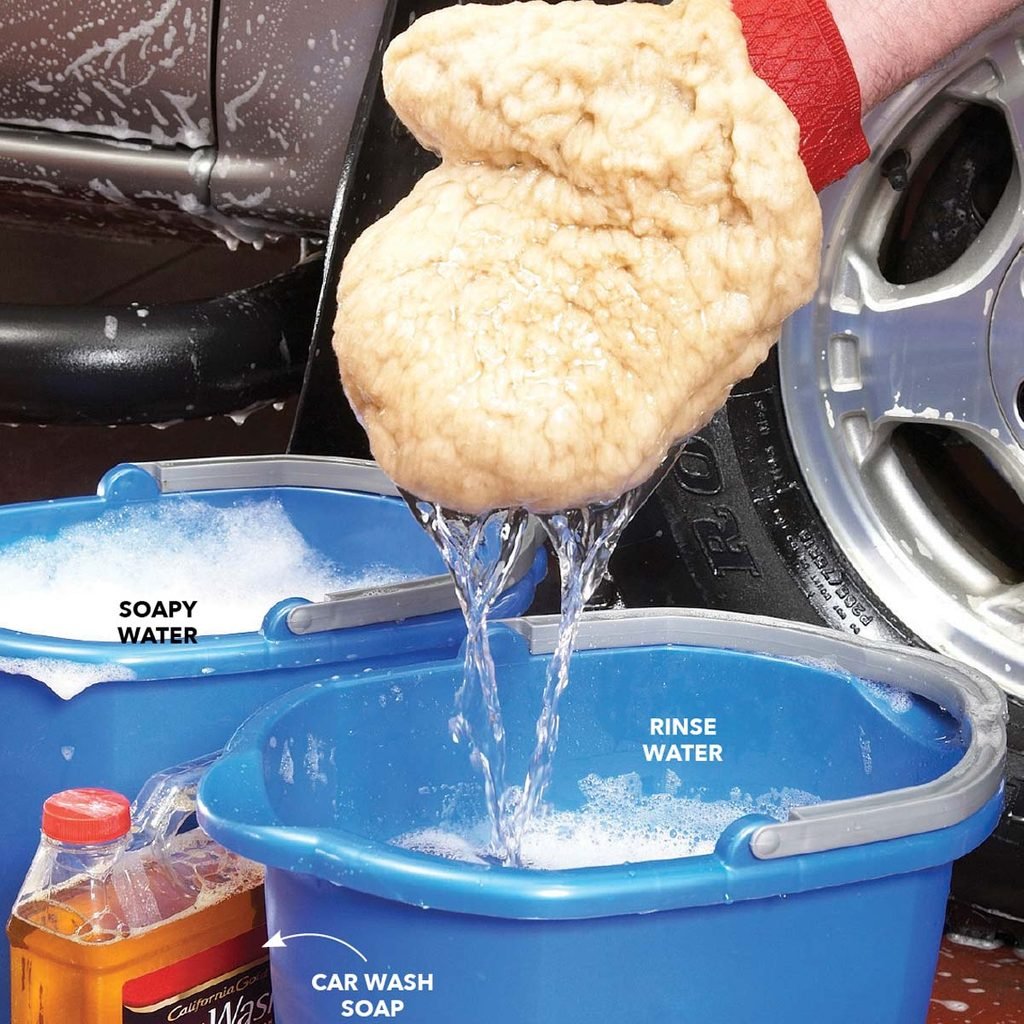
Ditch the Sponge, Opt for a Microfiber mitt
Sponges capture and hold dirt and grit in their large pores. You can wring it out, but the grit will stay put when car cleaning. Once grit is embedded, you may as well wash your car with sandpaper. Detailers use a
microfiber car wash mitt
since the sediment settles as you wash, it will cause
DIY Car Wash
that much better.
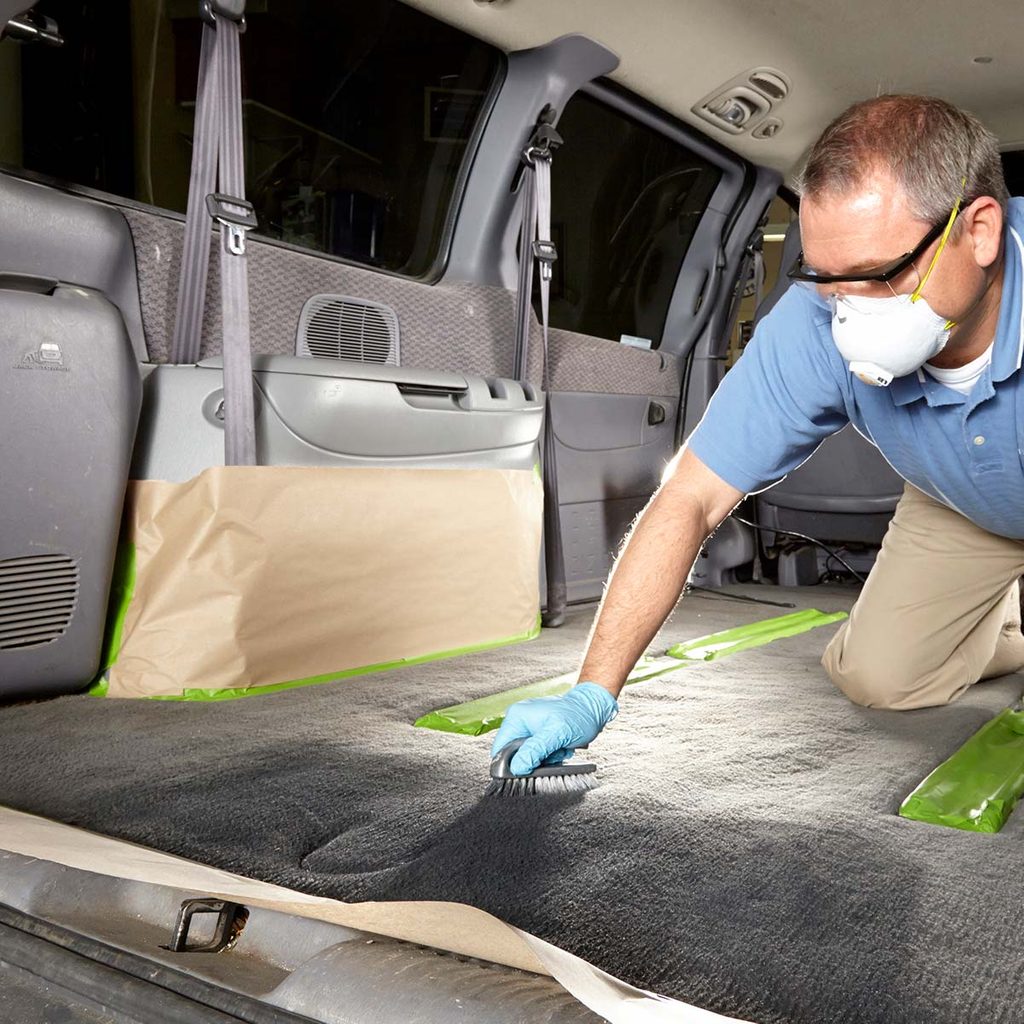
Wash Carpet and Velour
Apply Spray Plastic & Leather Prep onto the carpet or velour surface.
scrub lightly
Using a nylon-bristled brush. Allow it to air-dry and then vacuum.
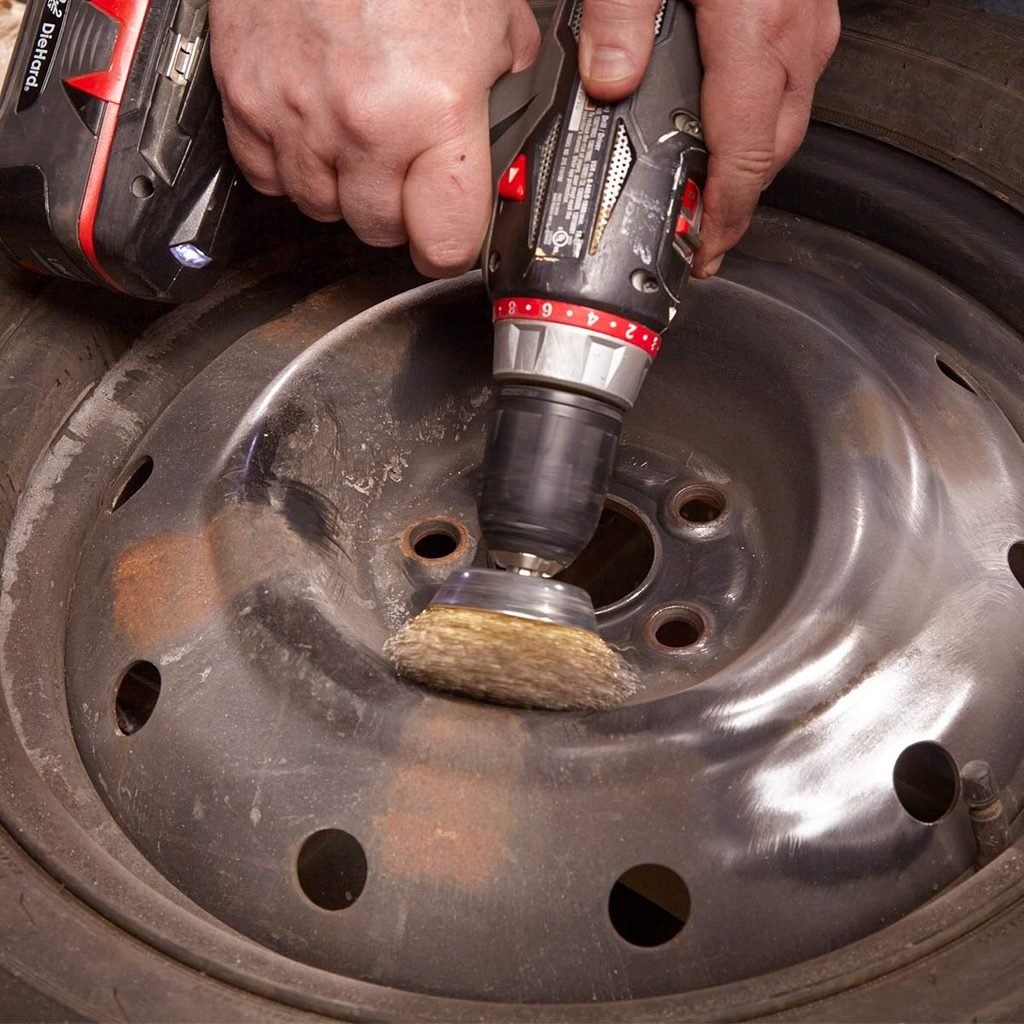
Refinish Wheels
Occasionally, an older vehicle might appear quite decent apart from some signs of wear visible on the wheels and hubcaps. Luckily, addressing this issue can be both straightforward and budget-friendly. The entire process of eliminating rust and repainting the wheels requires a whole day; however, much of that time involves allowing adequate drying periods. After completing the painting, ensure another 24-hour wait post-paint before reinstalling the wheels.
Here’s how you can accomplish this task.
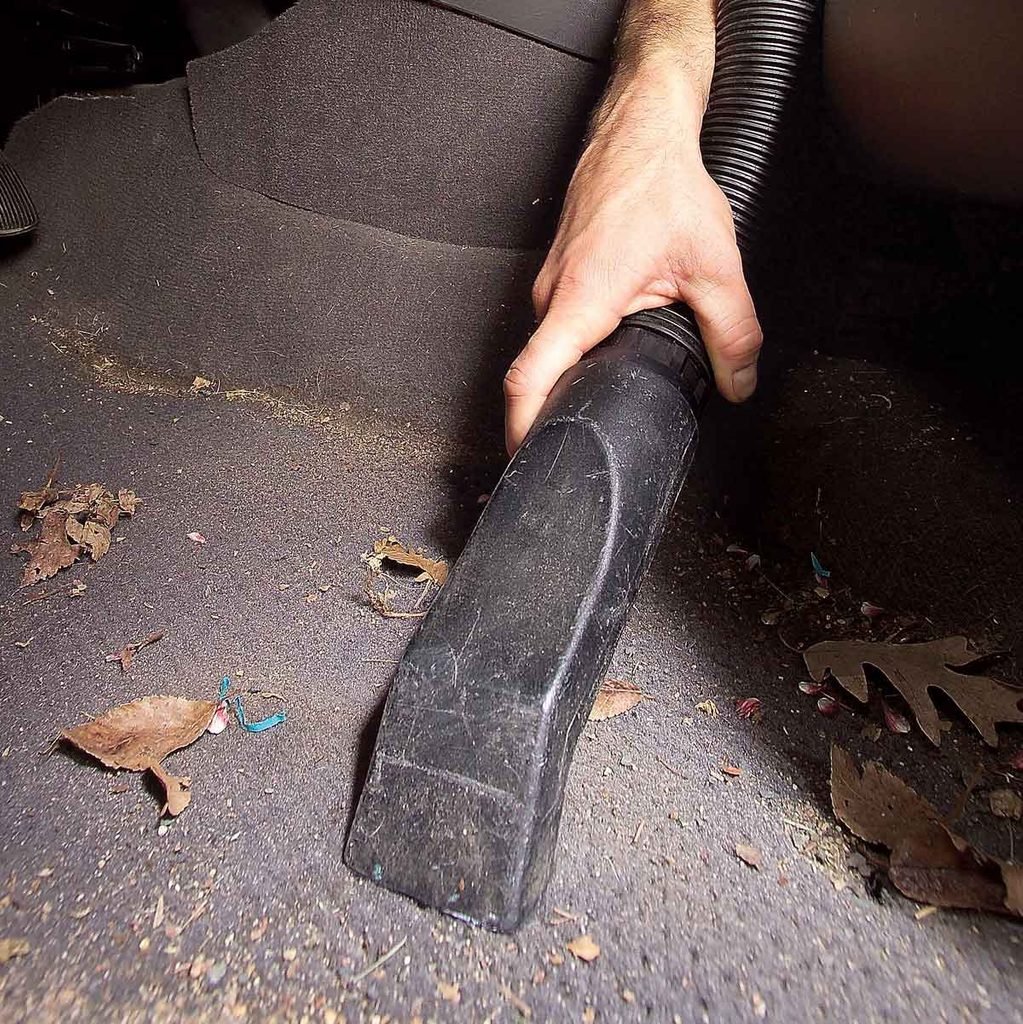
The Best Method for Cleaning a Car: Move the Seats Forward and Remove All the Clutter
You might be astonished at what turns up behind the seats. We discovered an abandoned cellphone, more writing instruments than a tiny workspace would require, and sufficient loose change for multiple meals from snack machines. Make sure to suck up debris from within the seats, lift off the floor mats, and thoroughly vacuum underneath them as well. Employ a brush tool for cleaning your dashboard and door compartments. Remember not to overlook tidying and vacuuming those useful storage spaces in the doors (a second hiding spot for forgotten items). Discover how one can properly cleanse these areas:
best vacuum
for the job.
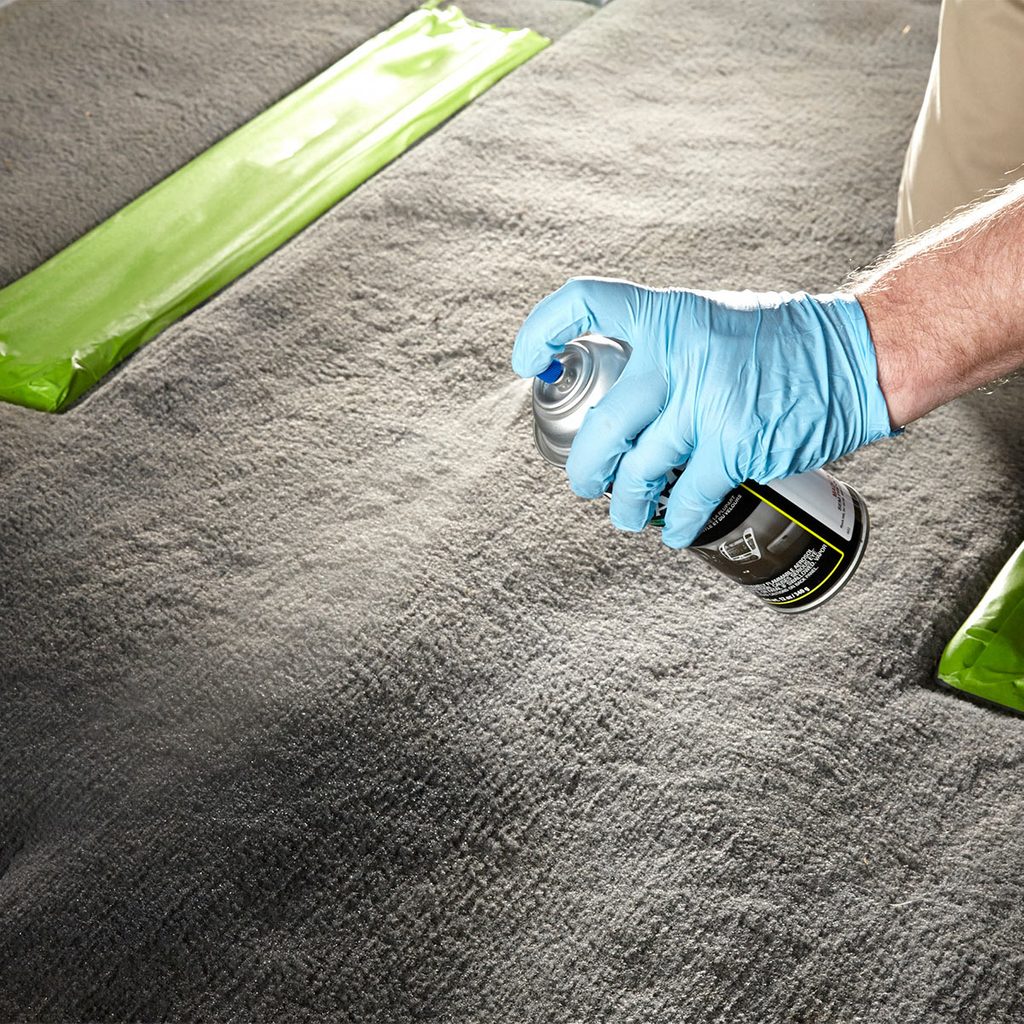
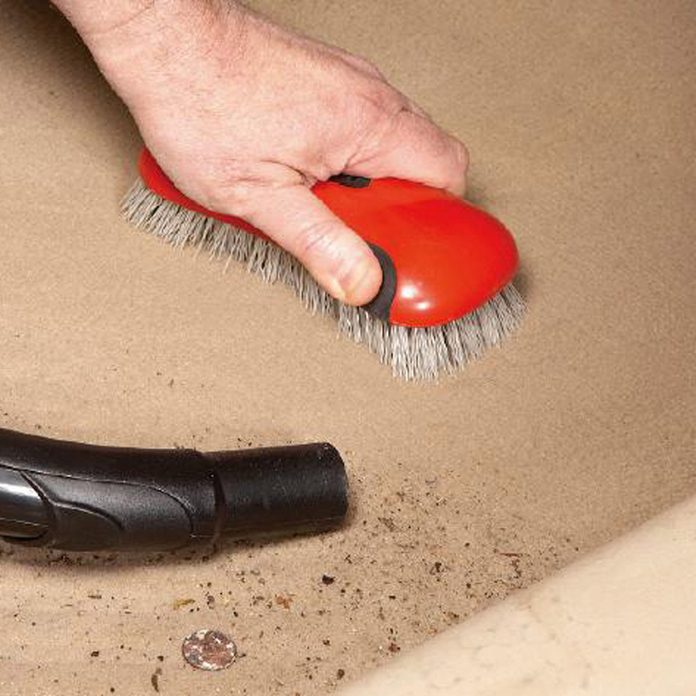
Scrub and Clean Your Rug
Carpeting within vehicles tends not to release dirt easily during regular cleaning sessions. Simply using a vacuum isn’t sufficient; it often leaves much residue behind. Professional Detailers combat this issue by employing a firm-bristled brush alongside their vacuum cleaner. As they scrub the carpets vigorously, they simultaneously suction out loosened debris, allowing for an enhanced clean during vehicle detailing processes.
Carpet and Velour Colorant
Add coloring agent to the carpet or velvet
And right away use a nylon-bristled brush to stroke in every direction, ensuring the fibers stay apart. Allow it to air-dry. Afterward, brush once more and vacuum.
Start at the Top
People who do DIY projects often begin by using a vacuum on the carpet during car cleaning. This action can push dust from surfaces like the dashboard, seats, and doors back onto the newly cleaned floor. In contrast, professional detailers follow a method where they start with the upper parts of the vehicle and progressively clean downward towards the carpet.
detailing cars
.
Optimal Method for Cleaning a Vehicle: Vacuum the Debris While Moving
Most DIYers start
cleaning the interior
By shampooing the carpet first, you might end up making it dirtier as you clean the higher areas. A better approach is to follow some car care tips: begin from the top and move downwards. Start by vacuuming the headliner, dashboard, center console, and door panels. Next, clean all the windows and mirrors, then remove dust from every small space. Use a detailing brush to sweep debris out of crevices before immediately sucking everything up with your vacuum cleaner. For additional guidance on this process, learn more here.
sanitize and rejuvenate your vehicle's cabin
.
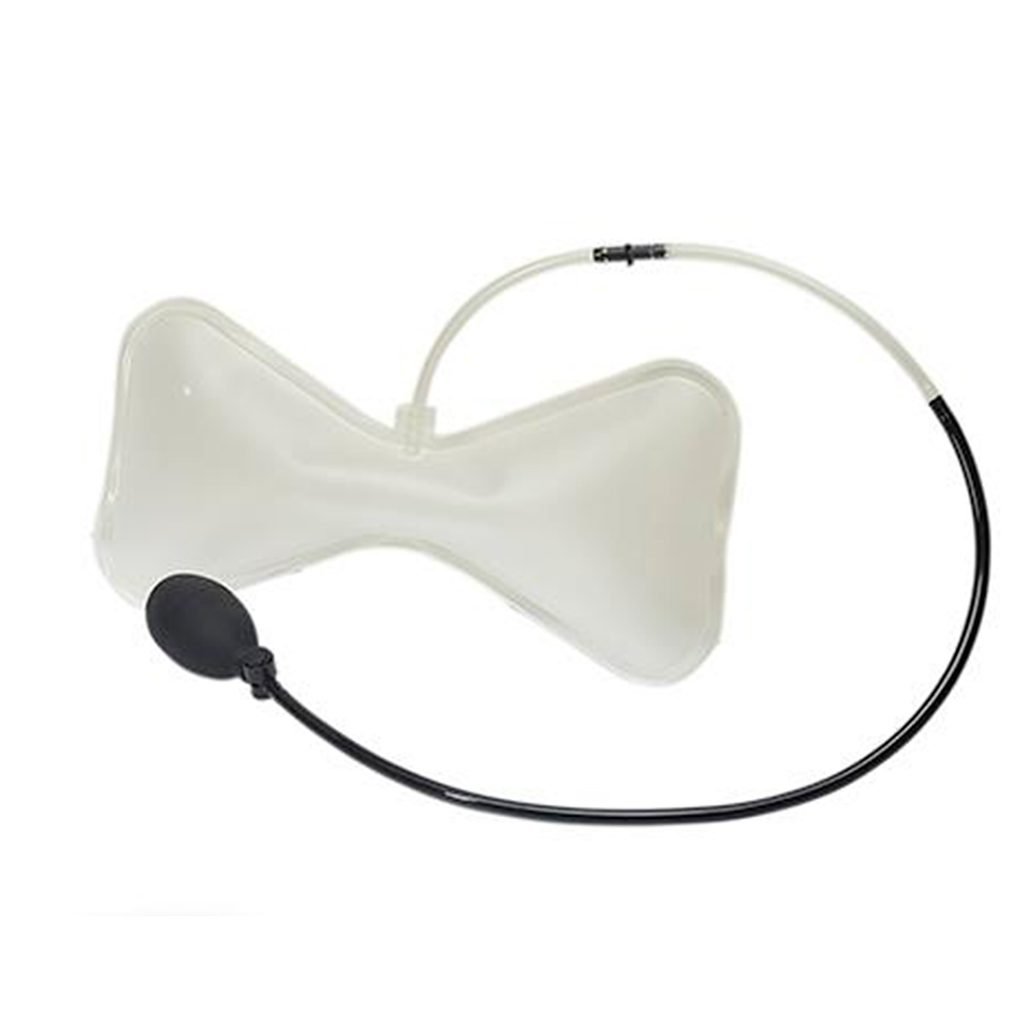
Add lumbar support
If you want
lumbar support
Slide this component beneath the seatback cover prior to securing it in position. Guide the pump and tubing towards the side. After installing the seat covers completely, use the pump to adjust the firmness.
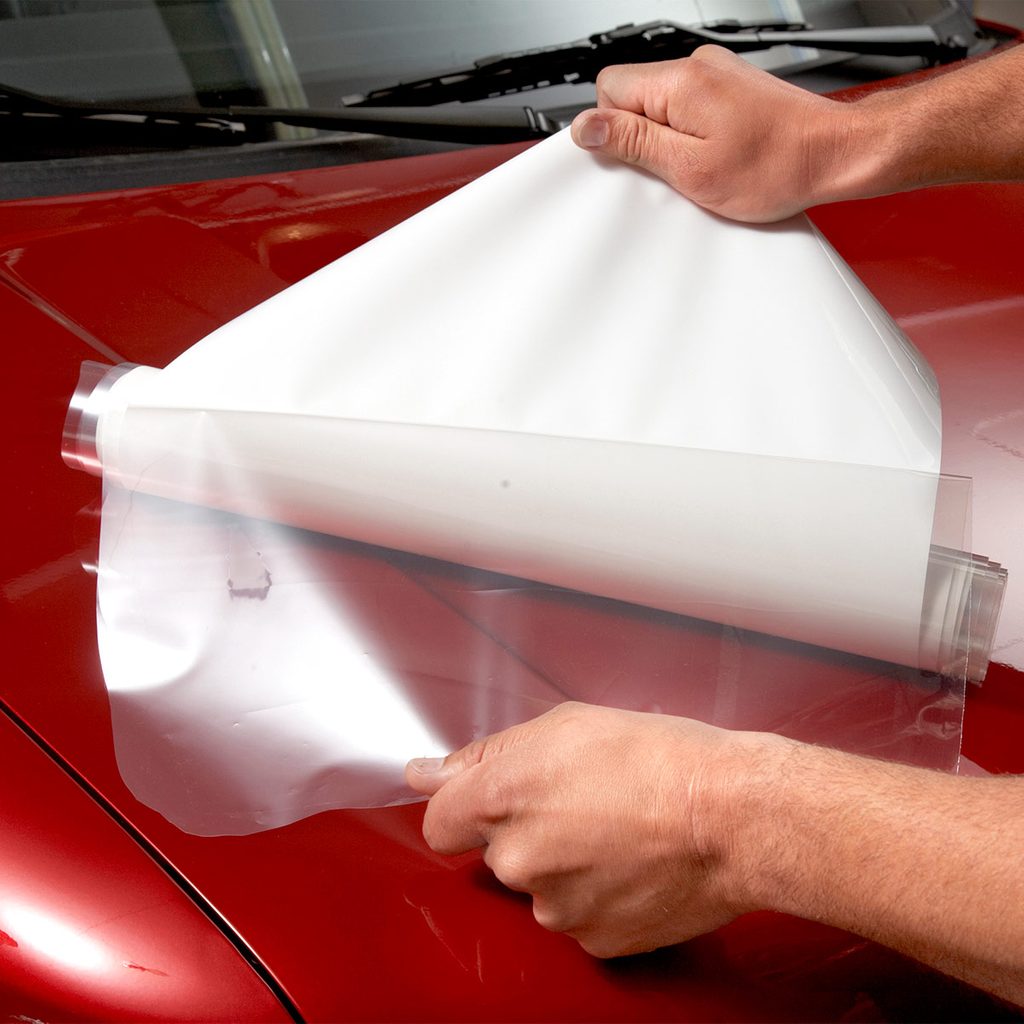
Apply a protective film
The undersized hood designs and streamlined side mirrors found on modern vehicles are highly susceptible to paint chipping due to small stones and other roadway debris. In order to safeguard the finish, car dealers typically cover these areas with a delicate, transparent, elastic coating. This protective layer significantly diminishes paint damage from such incidents; however, this service comes at an additional cost of around $400.
You can purchase the movie online.
And install it yourself within a few hours for approximately $120 (or even cheaper based on the car’s size). While it isn’t overly complex, it does require some practice. Therefore, buy an additional sheet of film specifically for your side mirrors and experiment with those initially. After mastering the techniques of wetting, stretching, and using the squeegee on your mirrors, tackling the hood will become significantly simpler.
Repair Small Paint Chips
Think about that time when a gravel truck speeding at 70 mph changed lanes abruptly in front of you, causing small marblesized stones to hit your car’s hood. This resulted in numerous minuscule nicks in your vehicle’s paint that might turn into sizable rust marks over the next few years. Address this issue promptly for under $10, and avoid spending much more down the line as well as preventing your ride from looking like an old wreck before its time.
The fix we show here
is for fresh chips that haven't started to rust yet. If you see a rust spot, or have a dent along with your chip, you'll need to do a more challenging fix than we show here. Keep in mind that this repair will be visible under close scrutiny, but if you buy the right touch-up color, it'll be unnoticeable from a few feet away.
Optimal Method to Clean a Vehicle: Remove Debris from the Exterior
A car speeding along the highway at 60 mph turns into a target for all sorts of debris in the air. While your vehicle’s clear coat shields from some particles, it may not fully protect against more abrasive bits. Regular washing helps remove loose contaminants, yet using a clay bar is necessary to extract deeply ingrained grime. Consider purchasing a clay bar kit (a popular option is
Meguiar's Clay Kit for Smooth Surfaces
) containing a lubricating spray and multiple pieces of synthetic clay. Start by dividing a piece of clay into four parts. Take one part and shape it into a flat disc between your palms; then apply it across the vehicle’s surface using a side-to-side movement. Continuously fold, knead, and flatten the clay until it becomes greyish. Discard this used portion and switch to a new piece until all “contaminants” have been removed for an almost mirror-like shine. For additional automotive techniques, check out these suggestions regarding dents.
You can repair them on your own.
.
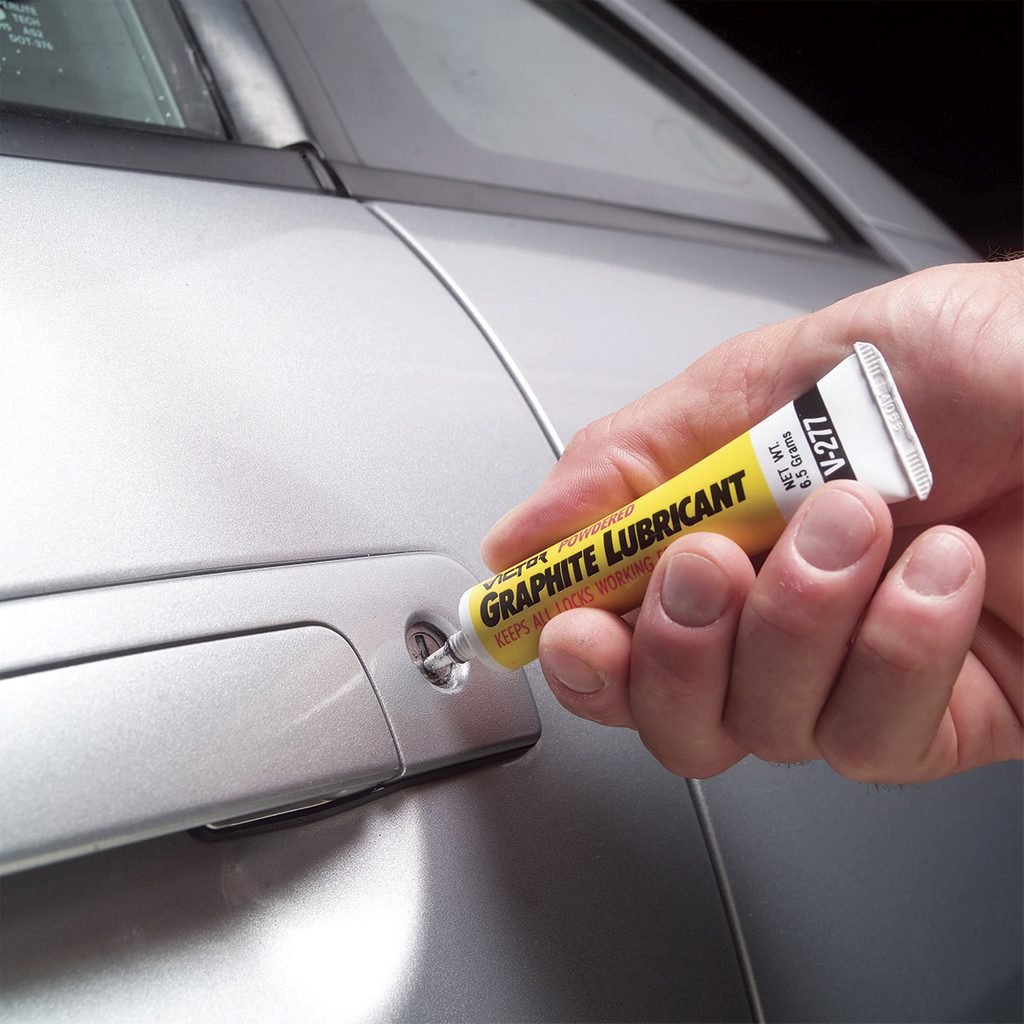
Include Graphite in Door Lock Maintenance
We seldom consider our door locks until a key snaps off inside the cylinder. Ensure these intricate components continue to function smoothly with a spray of lubricant.
dry graphite powder
You might have to gently push the dust cover tab aside using a tiny metal nail file to access the lock. Applying pressure to the tube once should release an adequate amount of graphite. Use your key to operate the lock mechanism multiple times, which helps distribute the graphite throughout. Repeat these steps for your vehicle’s trunk lock too.
Purchase dry graphite powder today from Amazon.
Skip the Chamois,Dry Instead with a Microfiber Towel
Sponges can absorb water, yet they fail to collect any remaining debris after rinsing; instead, they tend to press these particles into your vehicle’s finish. In contrast, a microfiber cloth gathers these particles effectively. Afterward, rinse the cloth with fresh water to eliminate the grit. Subsequently squeeze out excess water and continue drying your car yourself during the washing process.
Here's why microfiber cleaning cloths work so well.
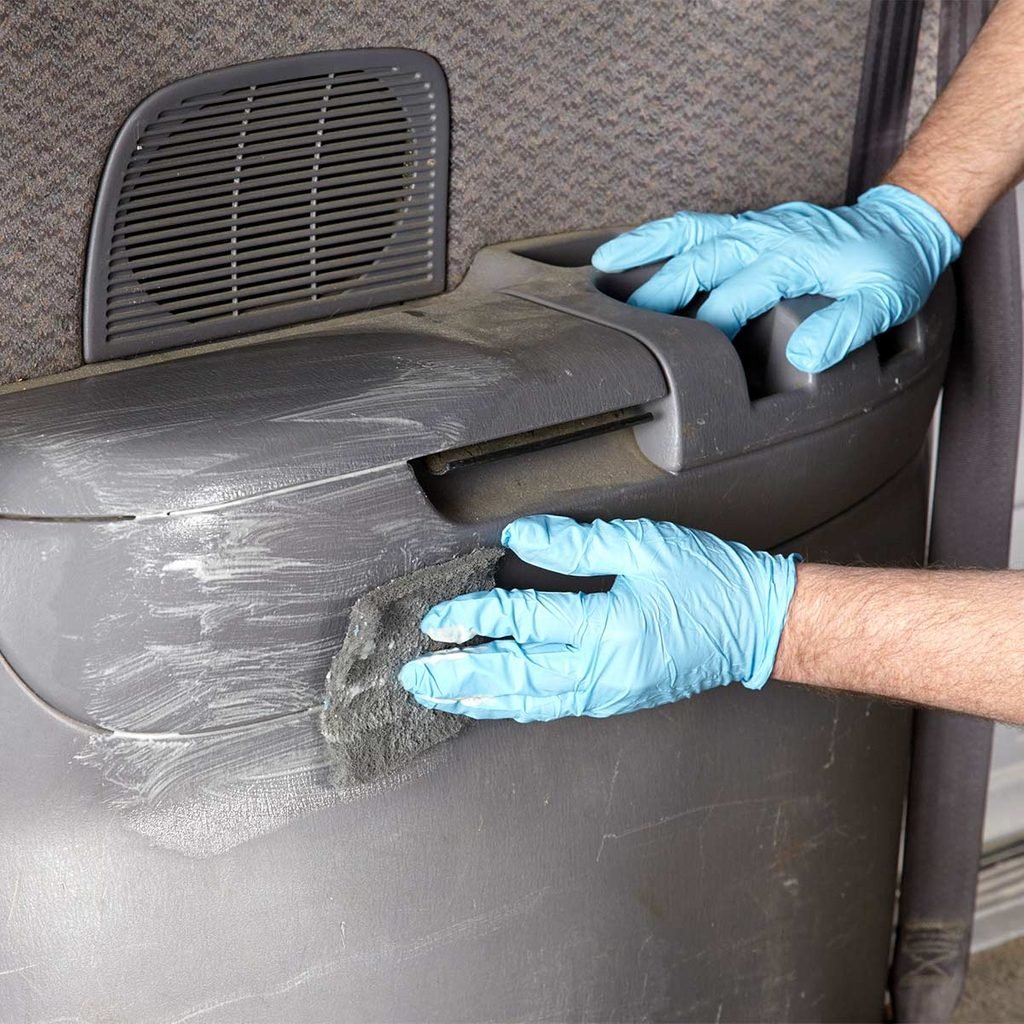
Wash Plastic and Vinyl
Apply
SEM Soap
to vinyl and plastic surfaces and
clean using a scouring pad
Focus additional attention on textured and recessed sections. Afterward, cleanse the area using a clean, slightly moistened, non-linting cloth, then allow it to air-dry.
The Optimal Method for Cleaning a Vehicle: Use Suitable Soap
Although hand dishwashing detergent is an excellent cleaner for removing grime, it’s not suitable for your car’s exterior. Indeed, it can eliminate dirt, grease, and old wax effectively. However, it strips away essential oils from the paint surface as well. Repeated usage will eventually degrade your paintwork faster. Rather than using dish soap, consider alternatives designed specifically for automotive finishes.
do-it-yourself car wash
Here’s one of our top car care tips: utilize a cleaner specifically designed for automobiles (you can find this at any automotive supply store). After preparing your soapy solution, take an additional step—fill another bucket with fresh rinse water. This extra container should be used frequently to rinse out the wash mitt, which helps eliminate much of the dirt and grime picked up from the roads and prevents scratching. Afterwards, simply toss the mitt into the washing machine to ensure it gets thoroughly cleaned.
Lubricate Trunk Hinges
Lubricate the trunk hinges
Using the technique applied earlier for the hood hinge, do not apply lubricant to the gas struts responsible for controlling the trunk’s opening speed (as this might damage them).
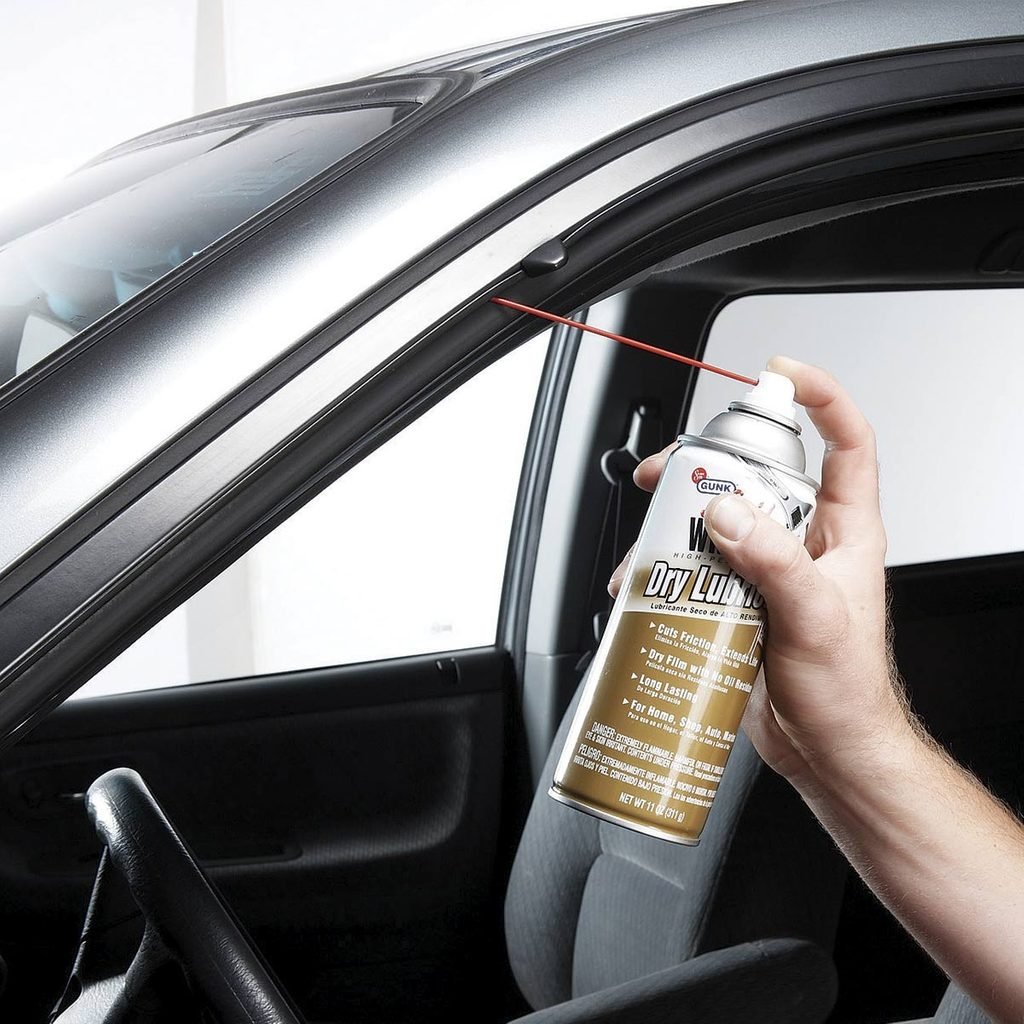
Lubricate Window Tracks
Spray window tracks
using silicone spray or dry Teflon for this
car detailing
A useful tip that can make a significant impact: silicone remains slippery even when temperatures drop, ensuring that windows move effortlessly. This reduces strain on your window motors, prolonging their lifespan.
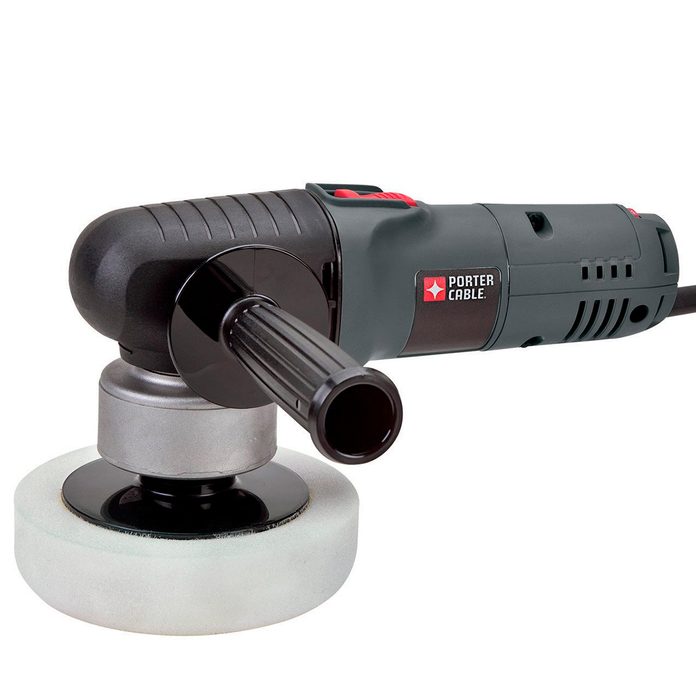
Buy a Dual-Action Polisher
Detailers would never be seen dead without
a dual-action polisher
Don’t mistake this amazing tool for a high-speed buffer! Buffers operate at significantly faster speeds and could strip the paint from your vehicle if used stationary for too long or with excessive pressure during detailing tasks. In contrast, polishers function at slower speeds and vibrate while rotating. Anyone attempting do-it-yourself projects will find mastering the art of polishing takes only a matter of minutes. Applying polish prior to applying wax yields remarkable benefits, ensuring your effort leads to substantial improvements.
One more polishing tip from professional detailers—apply the polish to the machine's pad. Then wipe the pad across your paint. That'll prevent all the polish from flinging off the pad as soon as you hit the trigger.
Discover how to fix chipped paint on your own.
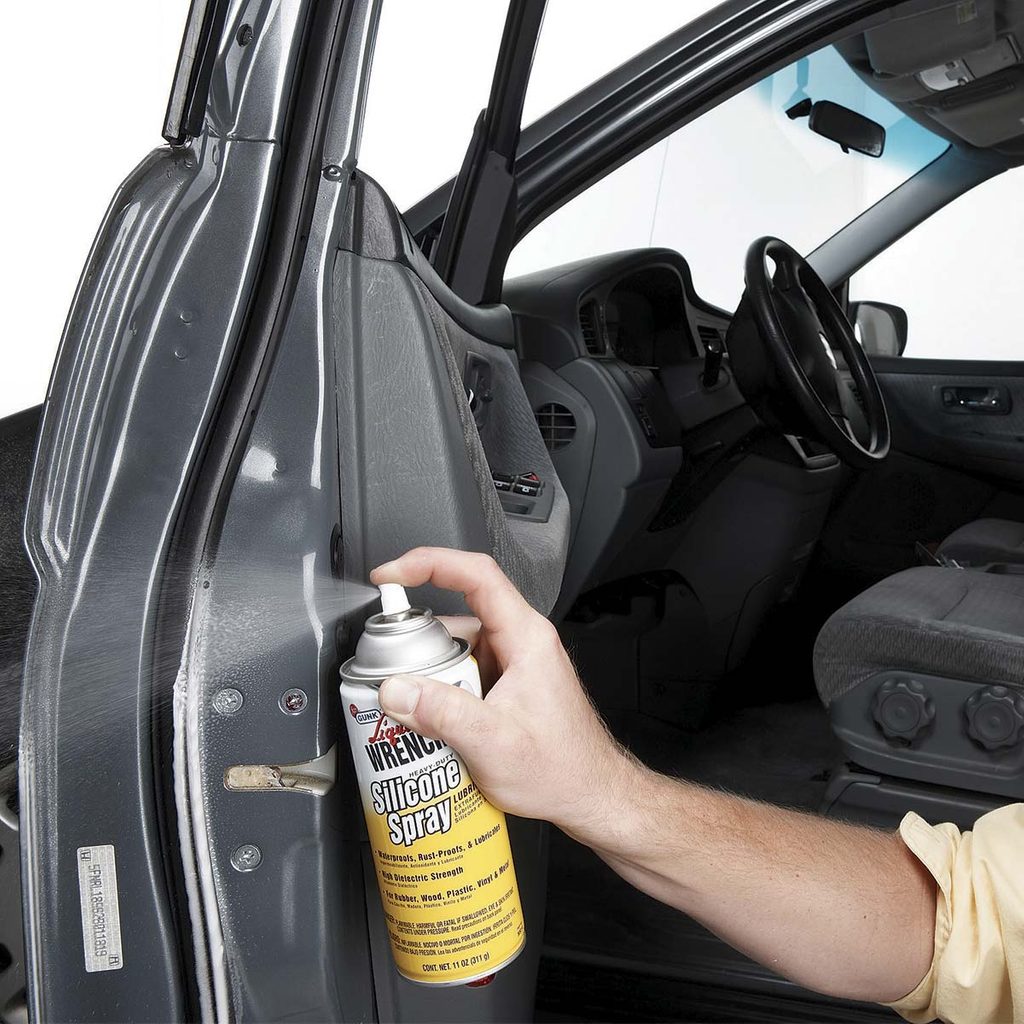
Lubricate Door Weatherstripping
Apply silicone spray to all weatherstripping.
Silicone can stop ice from causing the rubber parts to stick to the metal door frames. This makes opening the doors easier and could also help avoid rips in the weatherstripping. It’s actually one of those hidden gems in vehicle care techniques.
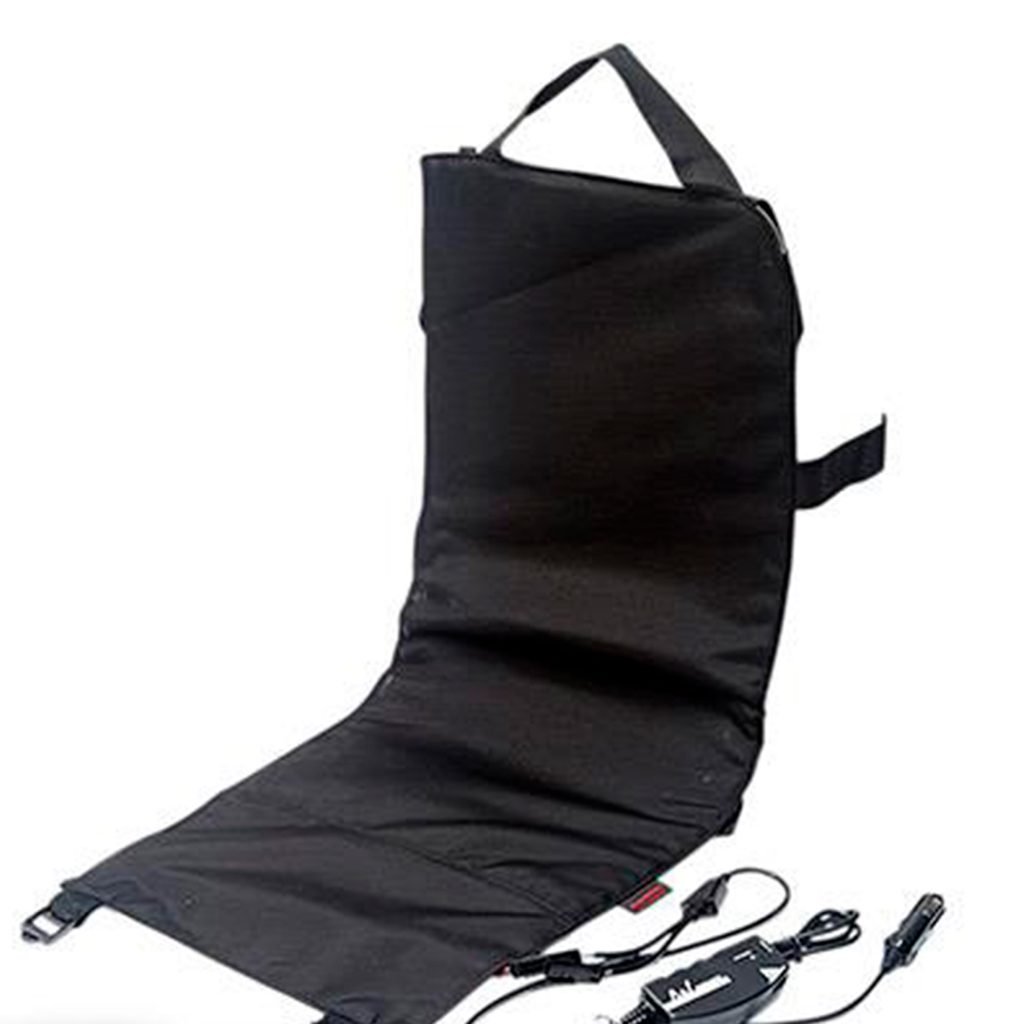
Add a Bun Warmer
If your vehicle didn't come with seat heaters, now's the time to add them. Add-on
electric seat heaters
fit between your existing seat cushions and the new seat covers and secure with elastic bands and straps. The seat heater control connects to a cigarette lighter or power outlet. The model we show here has an adjustable heat setting and automatic shutoff to prevent battery drain (in case you forget to turn it off).
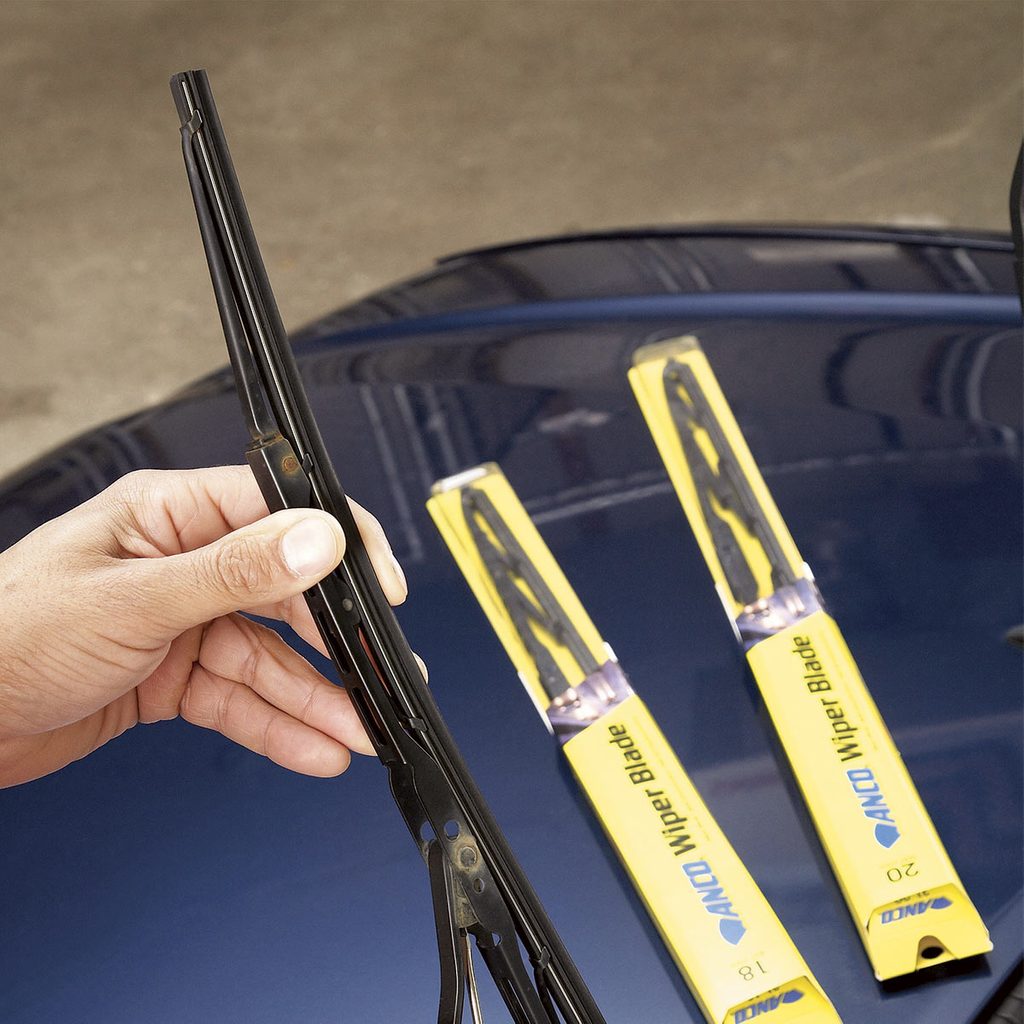
Replace Wiper Blades
It's easy to tell when your blades need replacing. Simply press the washer button and see if your blades wipe clean. If they streak, they're toast. The auto parts store will have lots of economy blades, but go with a name brand instead (ANCO, Trico or Bosch) for your car detailing project. They cost more than economy blades, but their higher-quality rubber wipes better, has better UV protection and lasts longer.
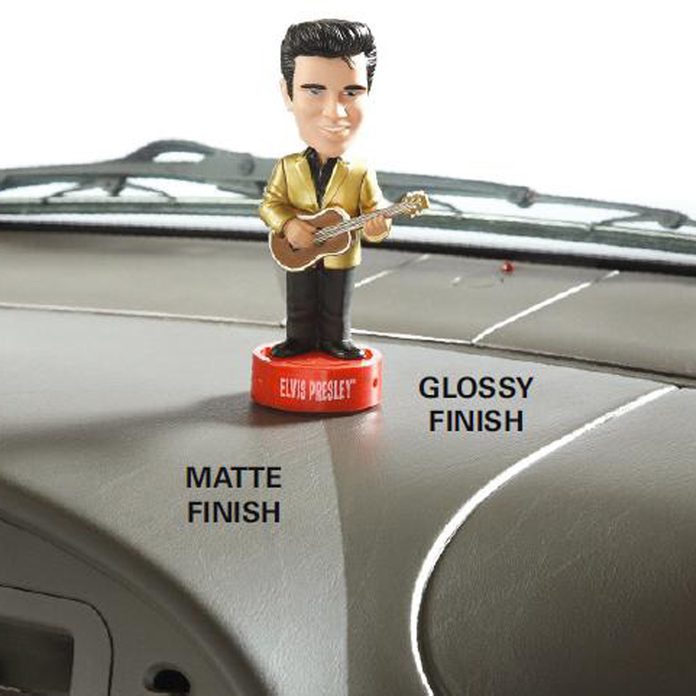
Utilize a Non-Silicone Matt Finish Dashboard and Vinyl Protector
Dashboard protectants made with silicone create a smooth layer that tends to attract additional dust, necessitating increased cleaning frequency. Moreover, a glossy dashboard may cast reflections onto your windscreen. These glares could impair visibility, particularly during nighttime driving. For these reasons, professionals opt for non-silicone matte-finish treatments which enhance appearance without contributing to glare issues. Below are eleven key suggestions for maintaining an immaculate vehicle:
1. ...
2.
3.
4.
5.
6.
7.
8.
9.
10.
11.
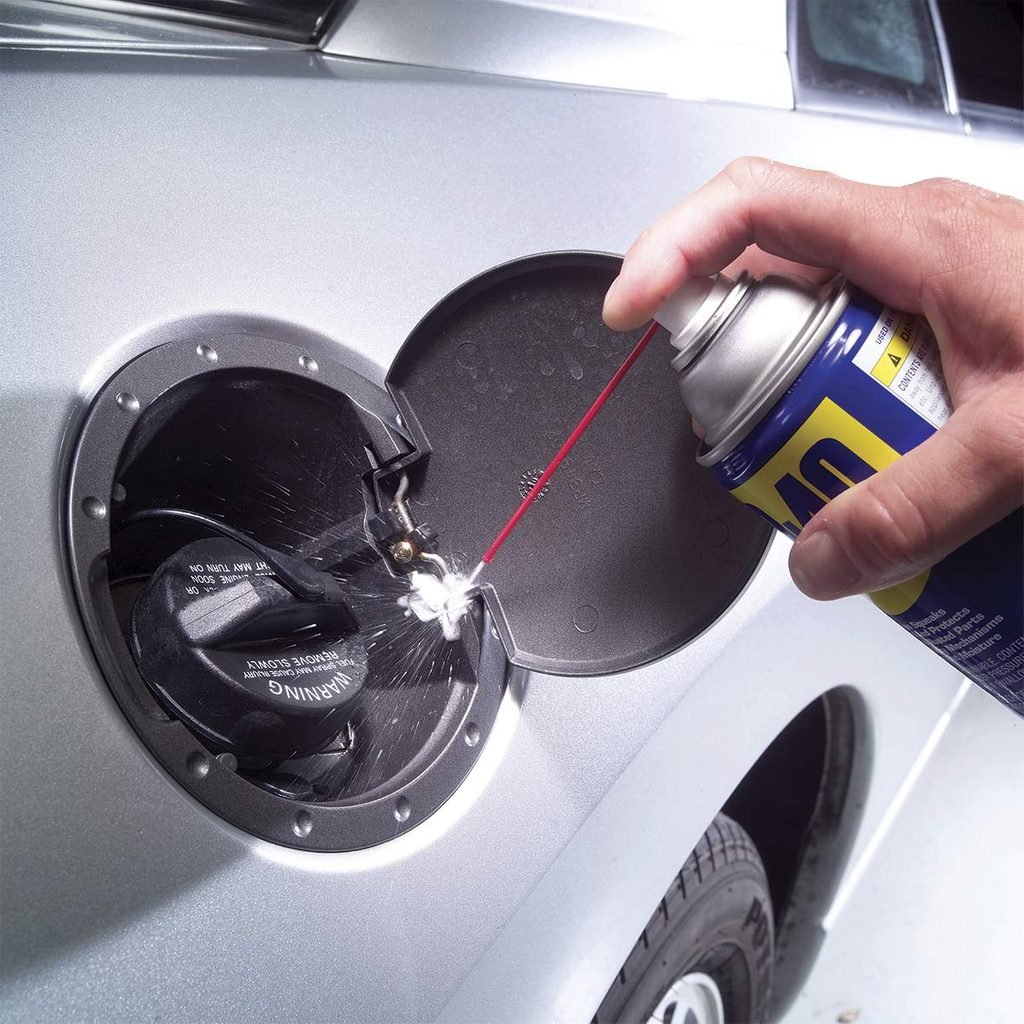
WD-40 Applications for Vehicles: Grease the Fuel Cap
The
gas tank lid
It really withstands abuse, particularly in harsh conditions. Just give it a spray.
WD-40
A few times each year to avoid rusting. Remove any extra to prevent dripping onto your vehicle’s exterior and stop additional car detailing needed.
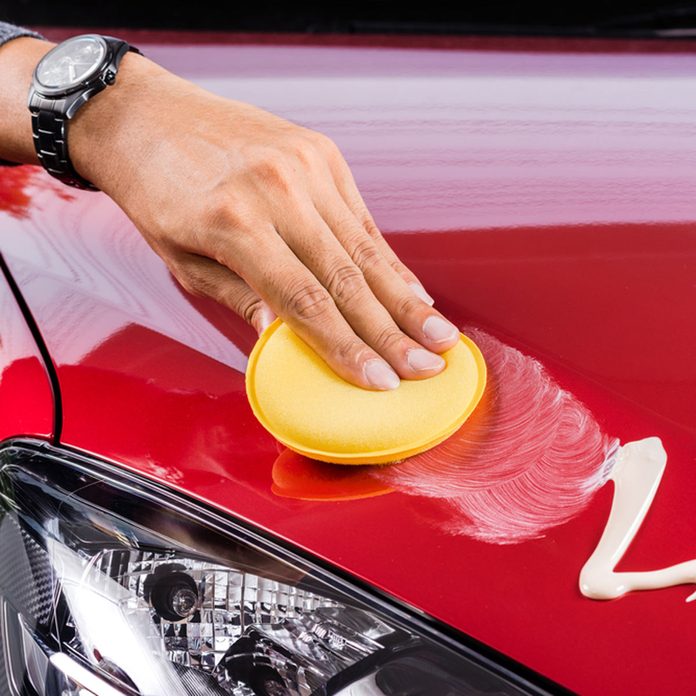
Use Synthetic Wax
Traditional paste waxes work well on vintage automobiles. However, they fail to achieve the same glossy, "wet appearance" as contemporary products do.
synthetic wax
, and they don't last as long when detailing cars. When car dealers sell paint sealant, they're really just applying a high-quality synthetic wax, which is something you can do yourself for a fraction of the price. Apply synthetic wax in small sections using a wax applicator sponge.
Take a look at this unconventional method of using car wax in your kitchen.
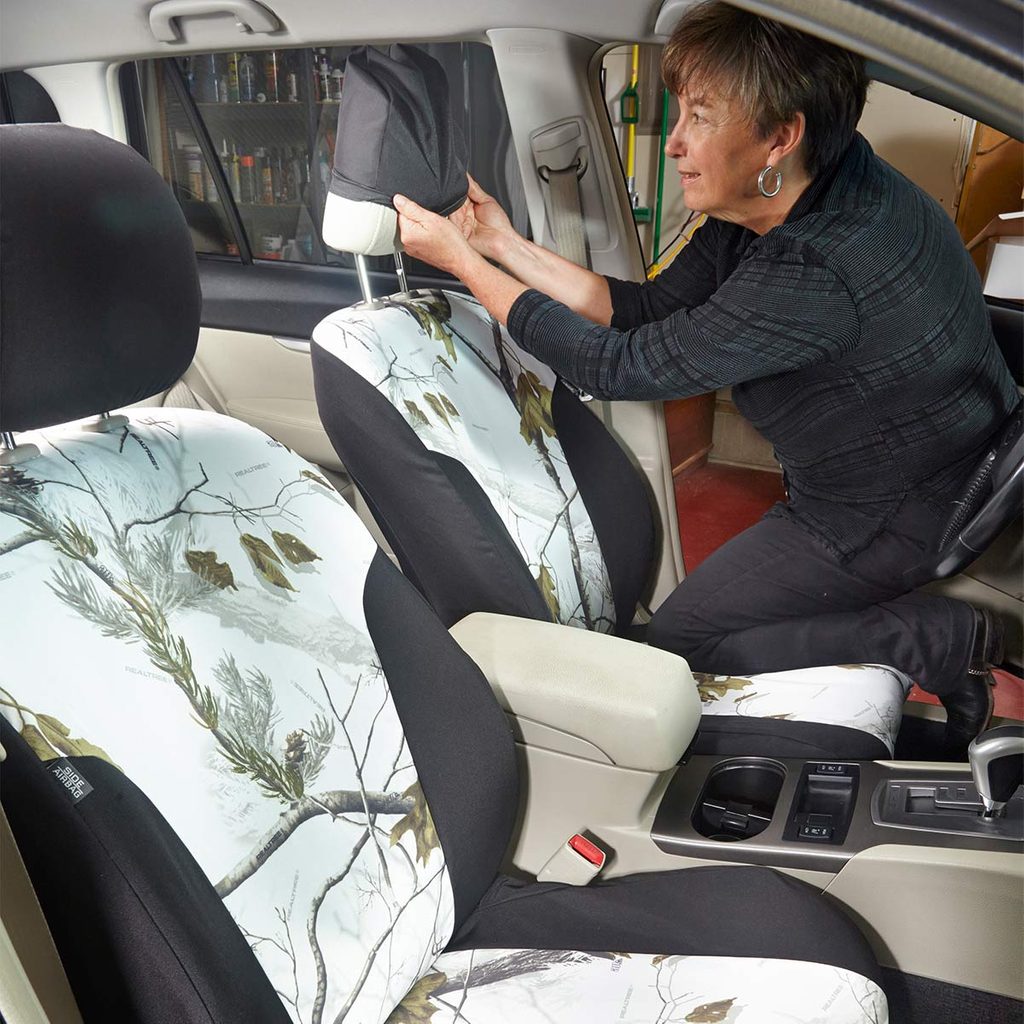
Replace seat covers
Regardless of whether your vehicle carries construction supplies, transports children and grandchildren, or simply ends up with spilled coffee, you understand how effortlessly it can become messy.
seat covers
To achieve a clean look, if they're too worn out even for upholstery cleaners and you wish to enhance your vehicle’s cabin, you essentially have three choices: Hire a skilled auto upholsterer to replace your seats (which would likely exceed $1,000); purchase second-hand seats from a salvage yard; or opt for installing new seat covers yourself. Replacement seat covers can be purchased at prices starting around $50 each for standard fits or approximately $150 apiece for premium customized ones. Installation procedures are generally consistent regardless of make and model. This task typically requires roughly two hours for both front and back seats. All you'll really need besides the cover kit itself are items like a bent wire clothes hanger and adhesive tape to guide belts underneath plastic moldings (should such components be present).
advice for tidying up your vehicle seats effortlessly
.
Finish With the Glass
If you had previously cleaned the interior of your windows before tackling the dashboard and applying vinyl protectant, you'd likely find yourself needing to clean those windows once more. This is precisely why professionals leave window cleaning for last. By doing so at the conclusion, you can remove any accidental cleaner spray from previous steps as well as overspray from the vinyl treatments, resulting in beautifully clear windows.
When you're ready to clean the windows at home, keep these 10 professional window-cleaning tips in mind.
The post
47 DIY Tips for Detailing Cars Like a Pro
appeared first on
Family Handyman
.


Post a Comment